Gamma Two--comfortably quiet Hardcore O/C Gaming/LAN Rig

Show off your quiet rig.

Moderators: NeilBlanchard, Ralf Hutter, sthayashi, Lawrence Lee

Post Reply
Edward Ng
SPCR Reviewer
Posts: 2696
Joined: Thu Dec 11, 2003 9:53 pm
Location: Scarsdale, NY
Contact:

Gamma Two--comfortably quiet Hardcore O/C Gaming/LAN Rig

Post by Edward Ng » Thu May 06, 2004 9:33 pm

Okay, after the highly dramatic failure that Gamma One was, I've achieved a satisfactory build in Gamma Two.
Here are some numbers to chew on:

Mobile Athlon XP Barton core running at 2466Mz, driven by 2.00volts with an FSB setting of 205 (411 double-pumped)

ATi Radeon 9800 nonPro running at 403MHz core rate and 344MHz video memory (DDR688)

5983 in 3DMark03

4309 in PCMark04

This is the first time I've taken a Socket A platform to a score so close to my Socket478 PCMark04 record of 4968, set by Alpha Three back when the Radeon was in it.

Anyhow I'm sure an extremely small portion of the SPCR community here cares about this sort of thing, so I wanted to get that up and out of the way before moving on with this, so that all-out silence members won't be disappointed in what I've chosen to do here.

Actually let me state it out right: the prerogative (sic?) with Project Gamma is all-out gaming performance in a highly portable system with highly acceptable (by overclockers' standpoint) acoustics. I will say right here, right now, that Gamma Two EASILY outperforms Gamma One at a lower noise floor in terms of volume, and a much, much lower noise floor in terms of sound signature!!! I found the number one limiter in Gamma One was the mainboard; the FN41V3 simply isn't up to snuff when it comes to the level of overclock I sought to achieve, combined with the I.C.E. cooling system that just didn't perform nearly as well as I was hoping for, and an outboard AGP slot that limited my choice of VPU coolers, forcing me to settle for less performance and more noise!

Gamma Two is the solution.


Components:

System Enclosure: Antec Super LAN Boy
Case Mods: Front exhaust and rear exhaust comletely cut clean using snips and lined with chrome auto door trim and AcoustiFan AF120CT softmounted to rear exhaust

Power Supply Unit: New Model Fortron FSP300-60PN
Power Supply Mods: Stock Yate Loon fan replaced with Globe 120mm thermal controlled fan, hooked into PSU internal fan wiring through an inline resistor that was included with an AcoustiFan

Mainboard: ABIT AN7
Mainboard Mods: Stock northbridge cooler scrapped in favor of Swiftech MCX-159, with fan removed and five pins removed to fit the tight spacing (see images below)

Central Processing Unit: AMD Mobile Athlon XP 2400+ (Stock 1800MHz)
CPU Cooling: Thermalright SP-97 with Japan-made Panaflow M1B

Memory: Two pieces, Kingston HyperX PC4000, 512MB each (1GB total)

Graphics Adapter: Sapphire-built Radeon 9800 nonPro 128MB card
Graphics Card Mods: Arctic Cooling VGA Silencer Version 3 and TweakMonster BGA RAMsinks

Hard Disk Drive: Samsung SpinPoint SP1614N

Optical Drive: Silver NEC ND-2500A


Images and Descriptions (For broadband viewers and people who are interested, clicking the image in this thread will bring up a blow-up of the image in a new window for you):

I chose the Antec Super LAN Boy because of its super light weight, 120mm intake and exhaust, outstanding build quality, decent looks and very good price point. I also like Antec's grommeted hard drive trays, which would serve as a good interim solution until I figure out a form of suspension that can hold up to travelling, assuming I can come up with one.
Image
The AN7 by ABIT proved to be an optimal solution for squeezing the most out of AMD's Mobile Barton core and proved far more capable than the poor example served by Shuttle's FN41V3 (the board included in the SN41G2V2 XPC). By raising the core voltage to 2.00, I am able to run the CPU at a solid 2466MHz, tested 100% stable with a 48hour straight Prime95 Torture Test marathon, at an FSB setting of 205 (205.5 as detected by CPU-Z).

By removing the plastic garnish in front of the factory-mounted 120mm Antec LED intake fan, I got access to the four screws holding the fan on, and simply abolished it. After that, I opened up the case and removed the six screws holding the front bezel on, leaving the front of the chassis exposed to my snips and I, which resulted in a decently open intake:
Image
The snips, of course, left some rather raw edges, which I decided to simply line with chrome automotive door molding, since it jives well with the silver case.

The stock exhaust fan does not come mounted, but comes wrapped in mounting instructions inside of the case during shipment. I removed the included silicone mounts and utilized them on an AcoustiFan AF120CT out back:
Image
As you can see, I also lined the raw edges with chrome automotive door trim in order to protect tender hands.

As you see in the image above, the PSU is blue:
Image
But I did not paint it; in fact, the latest Fortrons come from the factory this way! The fan also comes with a new, clear Yate Loon fan of the same model as the older, black model. In the image above, however, the fan is black; this is because I have swapped the stock fan for a Globe 120mm thermal control fan.

In fact they also come presleeved:
Image
and with new, easy to grip blue plastic Molex connectors:
Image
Overall, I am definitely loving the latest Fortrons. They've taken a great product at this price point and truly made it the best PSU for this price, bar none!

The CPU is cooled by a Thermalright SP-97 all-copper, heatpiped heatsink that is mounted through the board for secureness:
Image
Mounted on top of it using clips is a Panaflow M1B, attached to and thermally speed-regulated by the mainboard. The fan was custom-sleeved for $1.50 extra by Jab-Tech, and I lucked out as the M1B I received is made in Japan. I was also pleasantly surprised to find that it supports speed monitoring. If you don't get a chance to click on any other images, do at least click this one; I think it's one of the best photos I've yet taken! 8)

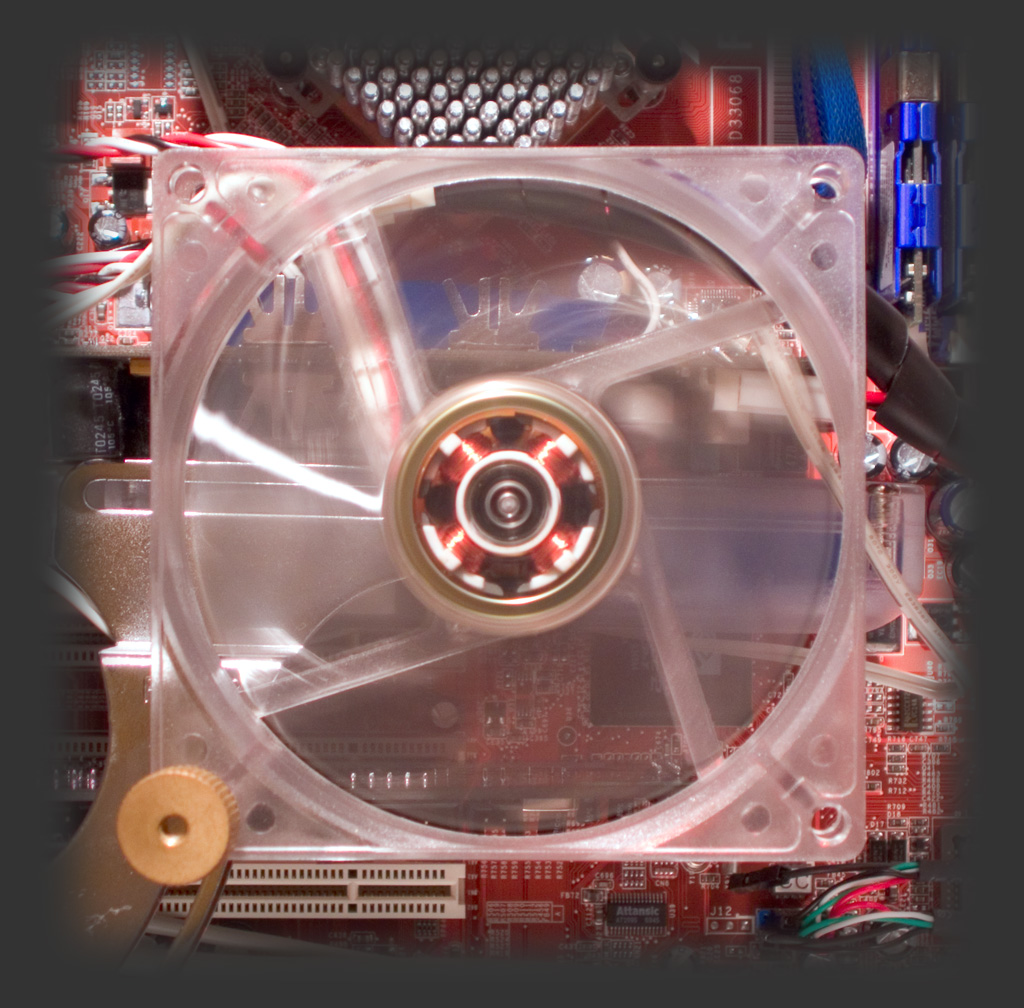
The stock northbridge proved a rather poor performer (ABIT's uGuru was detecting its temperature to be hitting over 50C!!!), and it was noisy to boot, so I swapped the stock ASUS cooler back into Alpha Three, since it made no difference, and moved its Swiftech MCX-159 over to Gamma Two:
Image
From this angle it is clear just how tight the fitting is, being that ABIT chose to place the northbridge literally right next to the CPU; in fact, I had to actually break off five of the helicoid pins from the nearside of the MCX-159 in order for the two sinks to be at peace with one another. This is another good image to click on and get a close-up of. :D

The video card has been heavily modified in order to extract the highest overclock possible on air cooling.
Image
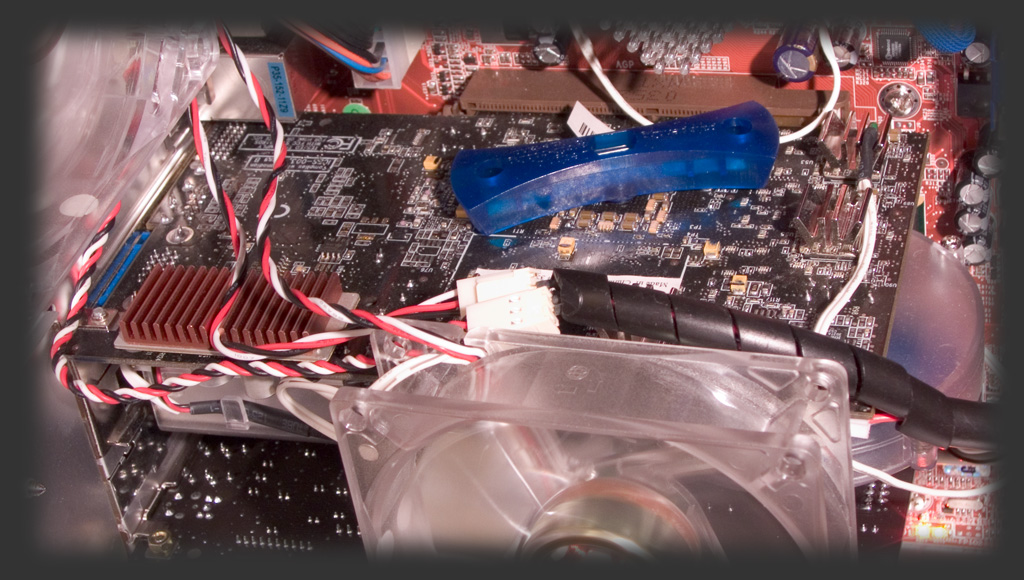
This image shows a couple things. You can clearly see the blue plastic shroud that Arctic Cooling has around the metal tension clip used to mount the VGA Silencer, and as you can also see, I have the TweakMonster BGA RAMsinks mounted so as to take best advantage of the flow of air coming off of the AF92CT that has been mounted to a Zalman fan bracket for blowing on the VRAMsinks as well as the northbridge cooler.

One of the best things about Arctic Cooling's VGA Silencer, and a distinct advantage (among others) that it has over Zalman's ZM80C-HP is that it leaves room enough for RAMsinks on the back, since it does not have much back there besides the clip, but it also leaves plenty of room underneath it on the front side for RAMsinks as well:
Image
From this view, a few things are notable; there is more than enough room for the frontside RAMsinks to fit under the VGA Silencer, as barely visible through the blades of AcoustiFan, which, as shown here, blows right across the card to the sinks. Right above the very same fan blade, just barely visible is a round, green thermal diode; this diode is blocked from view by the wire wrap of the power cable in the image above this one, and is wedged right into the RAMsink; it belongs to the AF92CT blowing over the memory. Finally, you can see how I was able to cleverly hide the floppy power cable going into the card by running it inside the wire wrap I used for the fan power cables, whose 3-pin connectors are visible in the image above this one. One connector for each AcoustiFan, the AF120CT exhaust and the AF92CT video ram and northbridge fan.

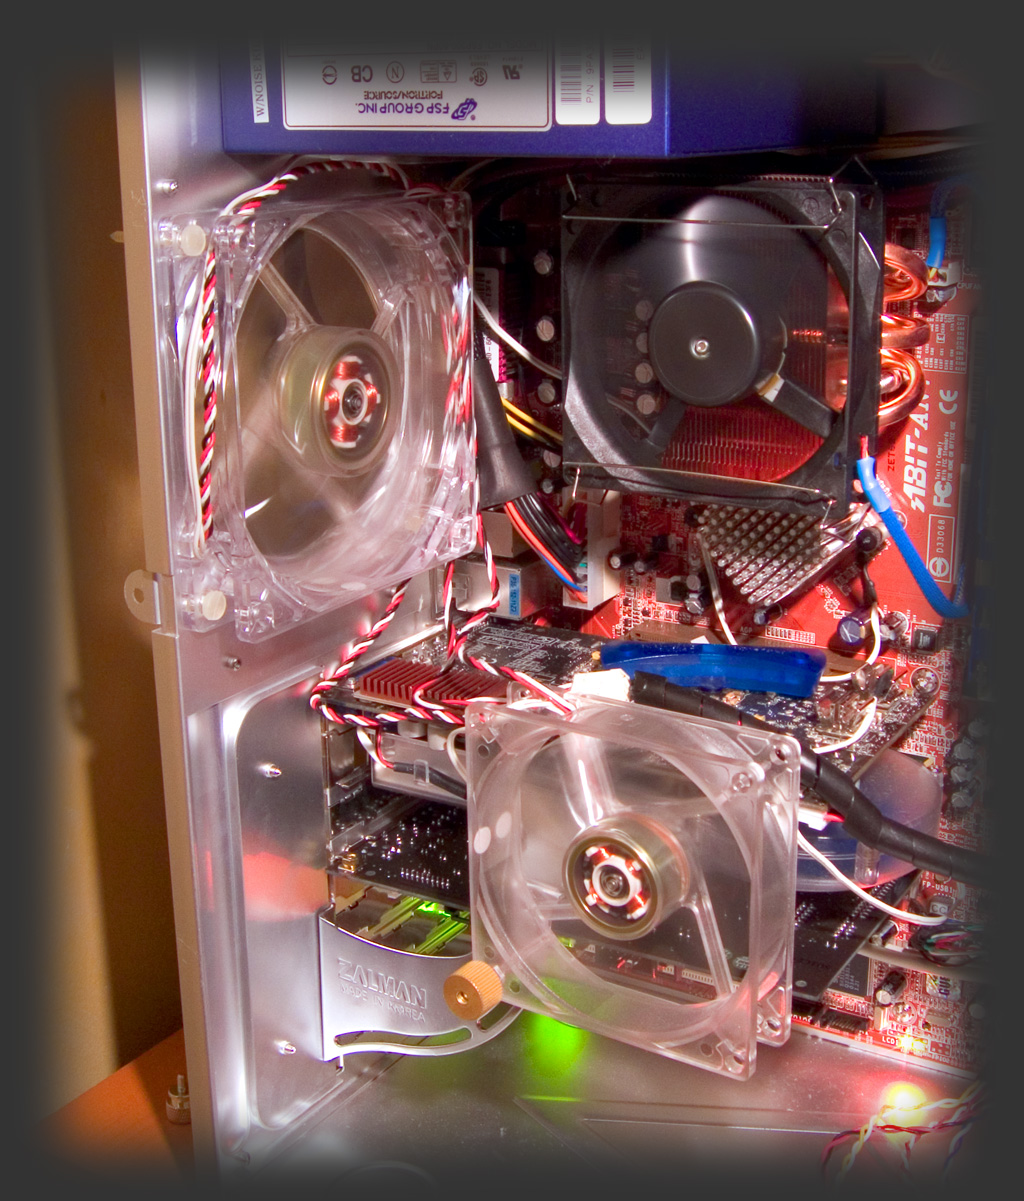
Finally, here is the outside-in view with the clear side panel on:
Image
This wraps up images.


Final comments (for now):

I know that the modifications to this system are very minor and not particularly special, but I am restricted in my focus points, being maximum overclockability and also maximum portability. I will continue to focus on improving this system's acoustics, as it is the loudest of my three rigs, and needs the most work. Also, I think of it as the greatest challenge and well worth it.

As it is, this machine is already far exceeding my expectations, and completely crushes Gamma One on every front except for overall size. Weight is not as good, but it's still very, very light, particularly for its size, and the included straps make transporation easy as pie, as I have already utilized twice now. This case, actually, is truly incredibly light; the side panels, in fact, are so light that I can handle them like nothing using only three fingers, and when the case was empty, as I was working on snipping the grills, I was able to pick the chassis up with one hand and flip it around almost like a baton.

Honestly speaking, the weight of the case is extremely close to the Shuttle XPCs; it's the PSU that easily outweighs that of the Shuttle, but the difference in power output and noise levels, particularly after modding, cannot possibly be understated.

Another thing about this setup that I'm much, much happier with is the fact that this case's hard drive mounting is already far superior to the Shuttle's. This SpinPoint was clearly audible while installed in the Shuttle, even over the incredible din of the exhaust/CPU fan. Here in the Super LAN Boy, it is much harder to hear it, even with the wide open front intake allowing its noise to escape. I have a feeling I won't focus too much on further quieting the drive until I try downvolting the AF120CT exhaust, as that's making more noise than the drive at this point, and I think I have to get extremely creative to, "securely softmount," the drive for transportability.

At first, I had considered somehow building a duct to the PSU, as well, but I found that it would be nearly impossible to do with a 120mm Fortron, particularly in this case where the gap between the PSU's intake and the CPU HSF is less than a quarter inch; I simply cannot come up with a way to isolate the PSU's intake from the rest of the system without choking it.

Of the things I've found out so far to be slightly nuisance is, of course, the fact that the aluminum case does translate more hum and vibration, particularly from the optical drive. At the time being I have other things to focus on before trying to dampen the case itself, and I feel that it will be very difficult to dampen this case without adding a lot of extra weight, which is most definitely something I don't want. Ideally, I can move from the Shuttle to this system with all gain and no pain and adding even more weight would further move me away from the convenience of the Shuttle.

Any comments and suggestions, as usual, would be much appreciated.

-Ed
Last edited by Edward Ng on Thu May 20, 2004 7:48 pm, edited 2 times in total.

Jan Kivar
Friend of SPCR
Posts: 1310
Joined: Mon Apr 28, 2003 4:37 am
Location: Finland

Post by Jan Kivar » Fri May 07, 2004 6:55 am

Nice pics, though some are bit odd-shaped (esp. the second one). Where are You temp-wise?

Cheers,

Jan

Edward Ng
SPCR Reviewer
Posts: 2696
Joined: Thu Dec 11, 2003 9:53 pm
Location: Scarsdale, NY
Contact:

Post by Edward Ng » Fri May 07, 2004 7:22 am

CPU Idle: 41C

CPU Max Load during those two straight days of Prime95 Torture: 55C (again, 2.00 volts, FSB205.5 and 2466MHz core)

Northbridge: 42C peak temp (receiving 1.7 volts)

HDD: 27C (lots of air coming in, hehe)

Oh yes the pictures are funny shapes; I did this for two reasons:

Firstly, I want the viewer to focus on exactly what is meant to be focused on and

secondly, there were things on the table that needed, um, hiding...

-Ed

MonsterMac
Posts: 330
Joined: Sun Mar 07, 2004 10:33 am

Post by MonsterMac » Fri May 07, 2004 5:33 pm

sick pictures.

RaNDoMMAI
Friend of SPCR
Posts: 337
Joined: Thu Jan 15, 2004 8:12 am

Post by RaNDoMMAI » Mon May 10, 2004 7:01 pm

Ahh Ed u rock man, i was thinking of getting this same case for lanning. i posted some questions in the article forum.

I decided to go over to gallery to see if anyone had this case and then BAM, Ed got it with pics=) and sweet edited pics at that. i see u like fogging the edges.


anyway about ur setup

I was wondering how bad is the noise from this thing? Do u get a hum like ralf got in his review?

How did u get a silver NEC2500a? i only got a black one.

I dont care about noise when i go out and LAN, i know my friends r gonna be yelling anyway, but at home i would like it quiet, would this thing bother me if i put it like a meter away under my desk?

also, why do u have ur ram in slot 1 and 2? i have an Abit NF7-s and when i put ram in slot 1 and 2 it was not dual channel, as soon i put the ram in slot 1 and 3 it said dual channel when i booted up the system. i really dont feel a difference tho.

Did u get a psu with the case?


Where did u get the tweakmonster BGA RAM sinks at? do they help alot?

thx
~RaNDoM

Edward Ng
SPCR Reviewer
Posts: 2696
Joined: Thu Dec 11, 2003 9:53 pm
Location: Scarsdale, NY
Contact:

Post by Edward Ng » Mon May 10, 2004 7:41 pm

Silver NEC ND-2500A at Essential Computing; I buy from these guys all the time, since their prices are decent, and they offer pick-up and cash payment. They're only about a 35 minute drive from my home (gotta' pay $7 toll though, ugh!), but I know they're good people with good service!

The BGA RAMsinks are only as useful as you make them to be. Installation is optimally done using thermal epoxy, rather than frag tape, and if you install just them, you can get maybe 4 to 8MHz more overclock from your video memory; blow a little air across them and they can help you get maybe 10-12MHz more on your o/c (compared to no sinks at all); I like them more for the bling factor than anything, but a couple more MHz on my o/c doesn't hurt, either.

TweakMonster BGA RAMsinks at Performance-PCs; I've ordered from these guys a few times now. They offer excellent custom-sleeving options for people like you and myself who want to bling-up their wiring a little, and a nice selection of modding/cooling equipment that isn't always available in other places. It's a smaller private owned place that the owner deals with customer issues directly, and he always provides good service, too. Also take a look at their premodded PSUs; they offer the Enermax NoiseTaker 470 with custom sleeving, custom molex connectors, an option for modular cabling (only install the cables you need) and even a right-angle molex option.

Fortron-Source FSP300-60PN at NewEgg.com; I also bought my Super LAN Boy from here (bought them together in the same order); the Super LAN Boy does not include a PSU.

As for the RAM being in those slots, that's the order that ABIT's manual stated to install them in and I have yet to try an alternate installation method, but judging by my benchmark results, it appears to be running in dual-channel mode. I will probably try swapping the second DIMM over to the third slot some time just to try, but I don't know if it makes a difference; perhaps ABIT assigned slots 2 and 3 to the second channel and slot 1 to the first channel on the AN7; I had an NF7-S 1.0 back a while ago and it was slots 1 and 2 for channel one and slot 3 for channel 2, which is why I had to put them in opposite slots like you. It's a shame ABIT does not specifically state what arrangement is DualDDR.

I never experimented with the case using the stock fans at all! The rear fan I never installed, having immediately installed an AcoustiFan AF120CT upon initial build, and the front fan I went through the trouble to completely remove, as I did not want a fan right in the front of the case bringing me noise (where I sit, my head is literally less than a yard from the front of the machine).

With the incredibly hard overclock I have going, I need to keep the AF120CT out back at full crank 12volts, as well as the VGA Silencer on High, in order to maintain these clocks with 100% stability and zero artifacting. I tried running it with the exhaust fan dialed down, the VGA Silencer on Low and I had to drop my VPU clockrate some 26MHz as well as the video memory some 12MHz, and to keep the CPU from hitting 60C and spinning at 12volts, as I have set in my mainboard, I had to drop core voltage to 1.8 and core speed to 2200MHz, which I'm not really willing to do at this time and point.

I do not get much hum except when the optical drive spins up. A combination of the aluminum construction with the solid hard mounting of the optical drive (I have this habit: where there's holes, there go screws; so I used all eight screw holes) makes the entire enclosure take to life when the drive is spinning full speed; luckily the NEC ND-2500A isn't too bad, acoustically speaking. I'd say it's nothing a little extra dampening material can't fix, but that means more weight and money. I prefer it this way, however, being that one of my objectives, here, was portability and lightweight.

I think part of the hum he experienced was from the hard drives. I am not sure what drives you plan to utilize, but I'm, "getting away," with stock mounting for my SpinPoint with max AAM quite okay for the time being; remember that my standards for noise were not as stringent in this build, since I utilize headphones to game, and I'm looking to maintain a pretty darn heavy o/c. If I use water cooling I could get quieter, but that would add a ton of weight to my build! I suppose if I didn't use as many fans at full speed, the effects of the SpinPoint would be more noticeable, and thus, need work.

I think this case can be made to operate quiet enough that shoving it into a desk a meter away could be quite close to inaudible, but it would take serious work, and you'd have to basically give up on any serious semblance of real portability. The drives must be suspended and you must use water cooling or run a lower powered machine, not to mention suspending the pump!

-Ed

EDIT: BTW; thanx. :)

Edward Ng
SPCR Reviewer
Posts: 2696
Joined: Thu Dec 11, 2003 9:53 pm
Location: Scarsdale, NY
Contact:

Post by Edward Ng » Mon May 17, 2004 10:15 pm

Did some more modding and overclocks to Gamma Two this evening; I was disappointed in my measly FSB ceiling of 205MHz, and decided to try something, which turned out with great success...

I discovered the L12 mod, which is supposedly beneficial to FSB266 Athlon users, particularly on ABIT boards, so I decided to try it out, being that I'm running an FSB266 chip (Mobile Athlon XP 2400+), and am using an ABIT AN7...

As it turns out, first of all, Randommai was right about my memory being in Single Channel DDR configuration. I happened to discover this in my testing, which happened as follows:

Step 1: Opened it up, swapped DIMM over from second slot to third (just because; figured it couldn't hurt...)

Step 2: Removed the SP-97 and the CPU; used a spare piece of fan wiring layoung around, pulled out two strands of wiring, twisted them together, cut them to length, bent it into a U and used it to perform the L12 mod.

Step 3: Reinstalled the CPU, completely cleaned and reTIMmed it and the SP-97, set it all back up, cleared the CMOS, and booted it up.

Step 4: Initial testing yielded poor results; in fact, I couldn't even do FSB200! I was quite dismayed, but noticed suddenly a new message that I hadn't seen before, which was the Dual Channel DDR message. I suddenly realized something...

Step 5: Shut down, open it up, move second DIMM back to second slot, close it up, turn it on...

Step 6: Voila, at 11.5 multiplier (was running 12.0 before), am able to run FSB214; a solid 9MHz improvement in FSB from before the mod! Since the core is maxed out at this point, I dropped multiplier to 11.0 and went up again on my FSB; hit 222 and it was still begging for more, but again the CPU was limiting, so once more I dropped it, to 10.5. At this multiplier, FSB225 proved 100% stable! I then tried FSB227, bit it was no good, and at this multiplier, even FSB227 wasn't maxing out my core, so I decided to raise multiplier back to 11.0, and then raise FSB 'til I hit my max core rate (since this chip has been, "burning in," the last couple weeks, I figured why not try for a little more), but FSB225 was a no go; FSB223 it is!

I'm REAL happy with that! I didn't bother to try testing what my max FSB would be in dual channel mode, since if it can't do FSB200, it definitely would be a drop in performance for me, knowing that in tests, the Dual channel mode yields hardly 1-3% gain over single channel, while increases in FSB yield much better gains. If I could control the timings on my RAM better, that may not be the case, since a lower FSB would allow tighter timings, but as it turns out, the Kingston HyperX PC4000 doesn't like anything but 8-3-3 3.0 on my AN7, so that nixes that idea.

I also cleaned up the wiring even more, and adjusted the mounting of the AF92CT; I'll have new pictures for you guys some time in the next day or two.

-Ed

Edward Ng
SPCR Reviewer
Posts: 2696
Joined: Thu Dec 11, 2003 9:53 pm
Location: Scarsdale, NY
Contact:

Post by Edward Ng » Tue May 18, 2004 9:31 pm

Okay, here're the updated images I promised; there will actually be more on the way, since my overall system shot got FUBAR 'cause I forgot to set ISO back to 50 (had it on 400 for some tripodless shots over teh weekend), but I went back to 50 when I shot moving fan pics so as to see through the blades (easy 'nuff with a tripod, thank goodness); I simply forgot to go back and reshoot the stuff I did at 400, so I'll probably bang those out on Thursday. I'm making sure to hold back on the funky-weird-photo-shape-insanity.

Boy... ISO 400 sure is messy on this camera *shrugs*

Anyhow, on to the pictures (per usual, broadband viewers may want to click on these images to bring up larger versions)...

Image
I don't have the overall system shot yet, to show, since it was done at ISO 400 and came out craptasticly grainy, but this close-up near my case ceiling hints at how I was able to hide more of my cabling at the top; I utilized the farside of the drive cage inside of routing cables into the bay. Thursday I'll show the overall system view, and you'll also get to see how much the rest of the case has been cleaned up.

Image
I came up with this shot today to clearly show how I had to break off some pins from the MCX-159 to fit, and how the CPU fan actually gets decent air to that northbridge this way. I also happen to think this photo came out real nice, and pretty much just wanted to share it (look at the pretty pipes runing through the sink!). :)

Image
As I mentioned above, I have reoriented this Zalman bracket mounted AF92CT in order to provide superior coverage to the video card and its RAMsinks, since I felt the northbridge is getting more than enough air, anyway. I was also able to bring down the fan power cables behind the fan frame to, "hide," them a little better.

Image
A new shot of the back of the video card, from above. I have moved the thermistor for the AF92CT to a farther back RAMsink, since I figure that one may be running warmer, being farther from the fan; this should promote a little more spinrate out of the fan.

I've been running the Ruby demo for Radeon X800 on my Radeon 9800 using this wrapper from Colourless, and let me tell ya', that's got to be the very best artifact finding tool I've ever seen. It single-handedly forced me to reduce my overclock on the video card dramatically, so I was moved to try and adjust the fan position accordingly, in hopes of reducing the need to drop my memory o/c.

Image
One last shot of the air zone; I don't know why, but it gives me a strange feeling of harmony seeing these several fans spinning together.

That wraps the images up for now; I should have pictures of the overall system as well as the, "desktop," I threw together for myself in the corner of my room for this machine; wait 'til you see it! I used bluetack to sttach a wide wooden board across two equal-height dressers diagonally, and placed the monitor beyond that in the corner, on top of one of the dressers.

Some of you may also have noticed that suddenly there's another card in the system; that's the Audigy 2 ZS I installed, as the integrated sound on my AN7 is rather junk.

-Ed

Post Reply