loving my nsk3480 [updated 23-7-2009]

Show off your quiet rig.

Moderators: NeilBlanchard, Ralf Hutter, sthayashi, Lawrence Lee

Post Reply
baconandeggs
Posts: 71
Joined: Mon Jan 19, 2009 1:15 pm
Location: New Zealand

loving my nsk3480 [updated 23-7-2009]

Post by baconandeggs » Thu Feb 05, 2009 12:35 am

hey guys heres my build in the ever so popular antec nsk3480. got it for a bargain as well.

my specs: not the best but will have to do for now
E5200 @ 220*12.5 (still yet to push it) VCore 1.1
Asus P5K-VM
Transcend aXeRam DDR2-800+ @ 4-4-4-12 DRAM 1.8V
WD 6400AAKS
Asus 7600GT Stock
Generic TV Tuner Card
Cooling
- 92 & 120 mm Nexus (intake and exhaust respectively)
- 120 mm Coolermaster A12025-12CB-3BN-F1
- Evercool HPFI-10025 Buffalo with TR Bolt Thru Kit

excuse the unpainted walls, still a work in progress as well xD
Image
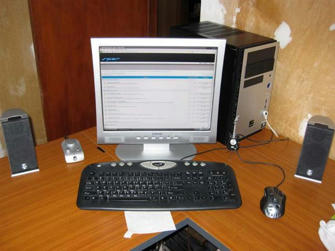
and theres my setup. SPCR Forums of course!

Chimei 17in LCD (RMAd once still going good)
Logitech Z-2300 THX (so much for silent :D)
Logitech MX518 Mouse (awesome)
Non Logitech keyboard :(
...
..
and sitting behind it, the NSK3480!

ImageImage
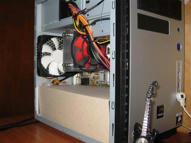
minor mod.. if you can call it that. just a piece of notepad backing cardboard (A4 size), bent to create of 'tunnel effect' for the graphics card and 92 mm nexus at the front.

ImageImageImage
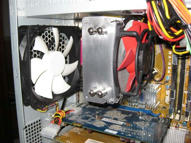
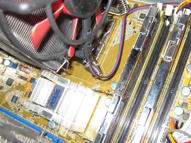
the nexus and cpu cooler. damn the red. cables here tucked neatly in the floppy drive bay. cable ties ftw! heres the thermalright bolt thru kit installed, way easier than the stupid intel 775 clips. was quite a mission installing the 92 mm fan to the cooler.

Image
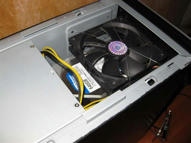
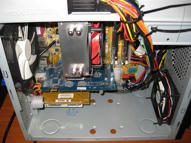
and here the coolermaster fan (suprisingly quiet at 1200rpm for my standards), mounted using some fishing lines to cool the hard drive now at about 32C.

Plans:
- cut some holes for cable routing. looking at 3 holes (one at top bay, one for atx connector in main bay and another for front panel connections). similar to Kricks in the gallery here. just need a decent holesaw and power drill.
- place my 9600GT in there once i can get an accerlo.
- powercoat the entire interior in black or maybe white. wanna go for a black/white theme, too bad the motherboard pcb is a yuck yellow.
- get and HR01, Xigmatek 1283/4, Scythe Ninja when i can afford it, with a nexus fan.

... man this case deserves some better hardware :(

runs cool and quiet-ish. can't be more happier with the case.
Last edited by baconandeggs on Thu Jul 23, 2009 12:28 am, edited 1 time in total.

baconandeggs
Posts: 71
Joined: Mon Jan 19, 2009 1:15 pm
Location: New Zealand

Post by baconandeggs » Thu Jul 23, 2009 12:27 am

Small update. Finally got around to cutting the hole, was pretty easy in the end.

Pretty much the same parts as originally, except added another WD640, a Zalman Fanmate2 and the 92mm Nexus for the CPU cooler.

ImageImageImageImageImage

New plans:
- get a motherboard with black PCB, possibly a DFI board.
- upgrade GFX card and CPU.
Last edited by baconandeggs on Thu Aug 13, 2009 12:09 am, edited 1 time in total.

thejamppa
Posts: 3142
Joined: Mon Feb 26, 2007 9:20 am
Location: Missing in Finnish wilderness, howling to moon with wolf brethren and walking with brother bears
Contact:

Post by thejamppa » Thu Jul 23, 2009 3:08 am

Looks very nice and clean box ^^

murvata
Posts: 4
Joined: Thu Jul 23, 2009 4:14 am
Location: new york

Post by murvata » Thu Jul 23, 2009 4:18 am

i find the case design very slick

robbie13
Posts: 41
Joined: Mon Jul 13, 2009 7:55 am
Location: Rijeka, Croatia

Post by robbie13 » Thu Jul 23, 2009 5:29 am

Image

bigger pictures! >:(

colin2
Posts: 145
Joined: Wed Jul 11, 2007 2:40 pm
Location: Seattle

Post by colin2 » Thu Jul 23, 2009 7:59 am

The holes are a great mod for this case -- better routing and better use of its limited space.

baconandeggs
Posts: 71
Joined: Mon Jan 19, 2009 1:15 pm
Location: New Zealand

Post by baconandeggs » Thu Jul 23, 2009 11:29 am

Thanks for the comments. :D
robbie13 wrote:bigger pictures! >:(
You can click the pictures i have, and then within those links you can choose, small, medium or large. :wink:

I highly recommend people with this case to do this simple mod... With that said, it does take some time to work out the best route for the cables but I'm very happy with the results.

Post Reply