
Okay, I have an original P180, with an improved door, and soon to be improved port pack (the set with HD Audio included).
Which means I am considering making this the time I hack up my P180 and hopefully never need to work inside this machine for a long time.
So I'm thinking of the following as some useful and relatively easy (and cheap) mods to get done:
1) Remove metal fan grilles in front. I have a Dremel, tin snips, etc...
2) Put in some cable management access points. Probably two near top of motherboard, and 2 near the front side of motherboard (atx and video power feeds). I have a metal hole saw. Also chop the back rail separating the lower and upper chambers, so I can get the cables up there.
3) Trim the filter door slats--I intend to keep the dust filters as they are great, and would prefer the look of the doors, but would like to help the airflow out a bit more. Between fan grilles and opening up slats I think this would help.
4) Drill a few small hole pairs on motherboard tray for tie wrap attachments points.
For smoothing the edges out, I'm planning on using my file to smooth the metal edges. Possibly masking them off and using liquid electrical tape as a finishing touch as well. I don't intend to remove the rear grilles, they are pretty open and I value my pain-free fingers. And probably not use the top vent--stick a piece of foam in there to block it off.
Any real obvious ideas I've missed?
P180 list of mods I'm considering...
Moderators: NeilBlanchard, Ralf Hutter, sthayashi, Devonavar
Re: P180 list of mods I'm considering...
For cleaning up the edge of a cutout I have had good luck with a strip of 150 grit sand paper, pulling it across the edge like a polishing cloth on the toe of a boot. Many of the online Modding retailers sell edging that might give you a cleaner look with less effort.psiu wrote: For smoothing the edges out, I'm planning on using my file to smooth the metal edges. Possibly masking them off and using liquid electrical tape as a finishing touch as well.
Regards
trident
I figure they are set back a little bit, plus if mount the fans with the soft mounts they will be even further away, so the low speed fan shouldn't be making a lot of noise...also don't want anything like cords, plugs, or my fingers getting beat up.CyberDog wrote:You should also remove those metal fan grilles from back too. It might make it a little more silent...
Yep, just don't want to spend money on u-channel type stuff...probably won't spend anything really. I have a low power processor (Athlon X2 BE-2300, 1.9GHz and 45W) and some spare Yate Loon D12SL-12 fans sitting around. I might get the closed corner fan mounts but that's about it.trident wrote:For cleaning up the edge of a cutout I have had good luck with a strip of 150 grit sand paper, pulling it across the edge like a polishing cloth on the toe of a boot. Many of the online Modding retailers sell edging that might give you a cleaner look with less effort.psiu wrote: For smoothing the edges out, I'm planning on using my file to smooth the metal edges. Possibly masking them off and using liquid electrical tape as a finishing touch as well.
Regards
trident
I do have sand paper too though, so that could help finish the job. Good tip. Mostly just want to make sure nothing will get cut on the edges (like me!).
I think I should be able to make some pretty clean cuts--I have good tools and sharp blades
To be honest, the computer is quiet enough for me anyway...just unemployed and bored and going to need to fiddle with it when the replacement plug pack comes in anyway.
<grumpy old man voice>stupid modernization of audio jacks</>
Nope, waiting on the order from Antec.xev wrote:Hey, any progress with your list?
I'm particularly interested with steps 2 and 4.
Debating a few minor accessories to get as well (some more fan standoffs, maybe some sound absorbing blocks, maybe stretch magic).
I plan on taking on pics a plenty, but don't anticipate any problems (of course, if I did I wouldn't be doing this
Re #4 on your list, I did that with my 182. I got a good result by removing the mobo tray then drilling through to a scrap piece of board. This involved drilling out the rivets with a Dremel and 3.5mm bit to remove the tray, then drilling 5mm holes in the scrap board to match the mobo standoffs so I could place the "top" side of the tray flat against the board and drill through from the back. Pics here, here, here and here. Obviously this does mean you'll need a riveting tool to remount the tray, but I found half of mine were loose anyway so it provided a good opportunity to kill two birds with one stone. I also cut an extra cable routing hole in the tray for my SATA cables, and tbh I got a good result just by filing down and rounding off with progressively finer metal files.
Update--nagged Antec via the support ticket I had to go check on the store--status quickly changed to "shipped" the next day.
Grabbed a Ninja Plus (the 1100 model) off ebay for $29.99 shipped.
Also a Radeon 4670 for $59.99 shipped.
Putting a Nexus into the Earthwatts 430.
Going to hunt down some styrene locally and do my best impersonation of cmthomson's duct work.
Blackworx, I like the path setup for cabling there...I might borrow that idea as well.
Trying to hunt down a cheap Kama Bay right now.
Also going to find some Stretch Magic for the hard drive.
Should be a week or two before it's all done...
Superquiet Superclocked DIY Core 2 Duo Systemxev wrote:What is cmthomson's duct work? I wasnt able to find his posts about it.
I'm interested because I want to eliminate 1 fan from my system and a duct seems like a good option
Has links to his first two articles in there also.
Of course, his approach to duct working is kind of awesomely overkill.
Going hunting for styrene tomorrow, need Stretch Magic and some other stuff from hobbyist/arts-crafts places too so I should be able to find I hope.
Going to try to have my wife keep an eye out for eggcrate foam/foam blocks at her job as well.
Thanks for the recommendation.psiu wrote:Superquiet Superclocked DIY Core 2 Duo Systemxev wrote:What is cmthomson's duct work? I wasnt able to find his posts about it.
I'm interested because I want to eliminate 1 fan from my system and a duct seems like a good option
Has links to his first two articles in there also.
Of course, his approach to duct working is kind of awesomely overkill.
Going hunting for styrene tomorrow, need Stretch Magic and some other stuff from hobbyist/arts-crafts places too so I should be able to find I hope.
Going to try to have my wife keep an eye out for eggcrate foam/foam blocks at her job as well.
It is overkill today, but it wasn't at the the time I created it, trying to cool an overclocked and overvolted Pentium D without going deaf.
With an 85xx CPU on an 8-phase motherboard, the top baffles aren't needed. With a recent midrange graphics card (eg, 9800GT) and an Accelero heat sink, the video/CPU separation baffle isn't really needed, but is an easy way to reduce fan speeds even more.
I would still recommend building the CPU duct so the CPU fan can be deep inside the box and all the CPU heat can be exhausted efficiently, especially if you intend to use it for folding.
There's a model railroad shop about 50 yards down the road.cmthomson wrote:BTW, model railroaders nearly all use styrene, so if there's a club in your area (they probably have a web site), they can point to to retail outlets.
It's someone working out of their home though, so don't know how much stuff they would actually have on hand. Going to try Michaels, looking for the Stretch Magic there too.
It's definitely overkill for my purpose.cmthomson wrote:Thanks for the recommendation.
It is overkill today, but it wasn't at the the time I created it, trying to cool an overclocked and overvolted Pentium D without going deaf.
With an 85xx CPU on an 8-phase motherboard, the top baffles aren't needed. With a recent midrange graphics card (eg, 9800GT) and an Accelero heat sink, the video/CPU separation baffle isn't really needed, but is an easy way to reduce fan speeds even more.
I would still recommend building the CPU duct so the CPU fan can be deep inside the box and all the CPU heat can be exhausted efficiently, especially if you intend to use it for folding.
AMD X2 BE-2300 (1.9GHz stock, 45W Brisbane core)
Radeon 4670 w/Accelero S2 (max power draw around 40-45W?)
All on a nice new Asus M3A78-EM board with all solid caps. Still, with the benefit of the lower power output it should mean I can run my fans at 5V and never have them ramp up.
Also plan on hacking in the cable management to my P180 that it doesn't have. Really my goal is just to use a lot of the little things that different people have done on here and put it into my own
Replacement front panel ports for the P18x series--this is the new ones that have HD Audio included, my ancient case only has AC97 which doesn't work too good with this new fangled motherboard (I actually got it halfway okay in Vista, but XP's sound management is definitely inferior). Main thing is that it will give me proper port detection and auto main speaker shut off.Bakkone wrote:Whats this improved port pack?
Got the replacement ports today, now I have to wait on everything else 
Also picked up 1.8mm Stretch Magic and found a train shop nearby, will go there tomorrow.
Also forgot how much I wanted to get into model trains when I was younger. Oh well, can only focus on so many hobbies at once...also spent money on a new sketchpad, couple canvases, big tube of white oil paint and fresh turpentine, oil and some extra brushes. Starting painting again the other day.
This project is going mostly well so far.
Removed front fan grilles and filed down edges, left attach points for filters.
Drilled twin holes and removed tabs for upper fan.
Used small remaining piece of Acoustipack on spoiler to cover up the holes, should allow air to vent out back and block noise from front.
Removed all the plastic HD cage mounting pieces.
Removed lower and upper chamber divider plastic pieces.
Used 1" hole saw for 6 separate access points on motherboard tray--aux12v, sata, and 4 along the bottom for various front panel hookups.
Used 1-5/8" hole saw for atx plug access.
Test fitted Kama Bay successfully with rails.
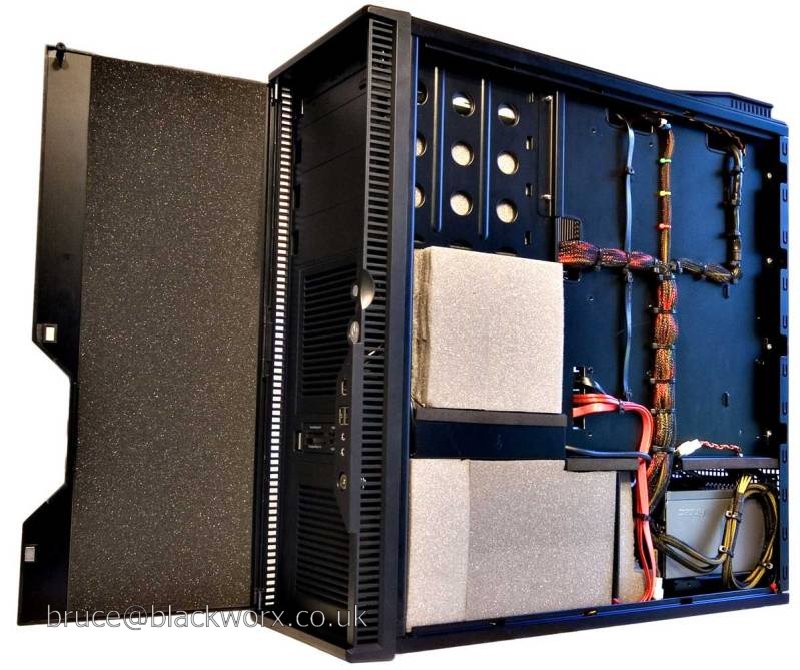
Devised foam baffling arrangement for upper (Kama Bay) and middle intakes.
Middle intake includes a 120mm Yate Loon set/mounted in foam as close to center as possible. Will run off motherboard header with Zalman RC56 resistor in line.
Most of the cable pathing holes are drilled in motherboard tray, will finish today.
Test fitted thick foam to mount on the divder under the motherboard which will also seal between the two chambers.
Used hacksaw to chop the chamber divider on backside of motherboard tray to get access for power cabling.
Used hacksaw to chop portion of external 3.5" bay to get access to backside of things as well.
Ninja mounted to motherboard, S2 mounted to video card.
Asus nameplate removed from northbridge.
Didn't change the thermal material from either motherboard heatsink--decided to stop fiddling with those infernal pushpins after a while and leave well enough alone before I broke something expensive.
To do still:
Dremel out upper fan grill.
Remove lower chamber fan holder.
Devise hard drive mounting in lower chamber. A big part of what I am aiming for involves some foam baffling at the front of each chamber to remove straight lines for noise. This will then be assisted by the front door dampening any remaining sound. This takes away mounting the hard drive closer to the front. It may just sit on some foam, but I plan on giving the Stretch Magic a go somehow.
Going to auto parts store today looking for some uchannel type stuff for holes. Should've ordered it earlier
The styrene will be going in last once everything else is in place.
Progress is a bit slow as we live in a townhouse apartment, have neighbors, I do the noisy stuff when they are gone for a few hours at a time
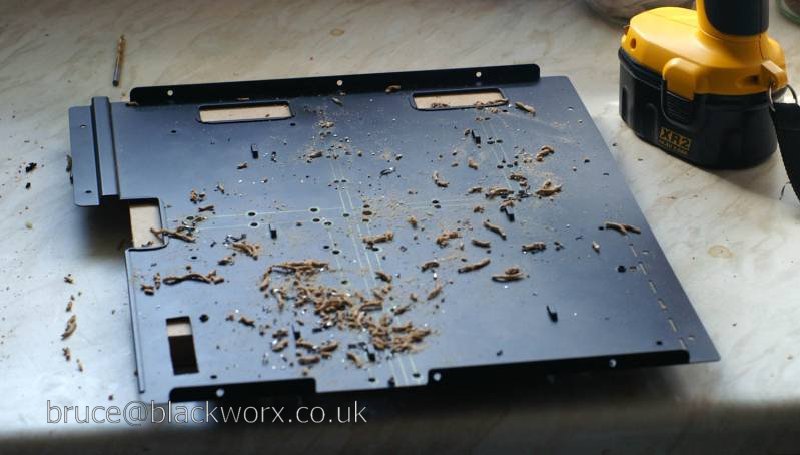
I am taking plenty of pics...not som much in the metal working part though. Will get shots of the finished cuts before installing everything though. Also did a stupid yesterday: had the case upside down for some filing and then some drilling...on the worksurface...covered in metal shards....plastic on top looks a bit rougher than it did.
*sigh*
Removed front fan grilles and filed down edges, left attach points for filters.
Drilled twin holes and removed tabs for upper fan.
Used small remaining piece of Acoustipack on spoiler to cover up the holes, should allow air to vent out back and block noise from front.
Removed all the plastic HD cage mounting pieces.
Removed lower and upper chamber divider plastic pieces.
Used 1" hole saw for 6 separate access points on motherboard tray--aux12v, sata, and 4 along the bottom for various front panel hookups.
Used 1-5/8" hole saw for atx plug access.
Test fitted Kama Bay successfully with rails.
Devised foam baffling arrangement for upper (Kama Bay) and middle intakes.
Middle intake includes a 120mm Yate Loon set/mounted in foam as close to center as possible. Will run off motherboard header with Zalman RC56 resistor in line.
Most of the cable pathing holes are drilled in motherboard tray, will finish today.
Test fitted thick foam to mount on the divder under the motherboard which will also seal between the two chambers.
Used hacksaw to chop the chamber divider on backside of motherboard tray to get access for power cabling.
Used hacksaw to chop portion of external 3.5" bay to get access to backside of things as well.
Ninja mounted to motherboard, S2 mounted to video card.
Asus nameplate removed from northbridge.
Didn't change the thermal material from either motherboard heatsink--decided to stop fiddling with those infernal pushpins after a while and leave well enough alone before I broke something expensive.
To do still:
Dremel out upper fan grill.
Remove lower chamber fan holder.
Devise hard drive mounting in lower chamber. A big part of what I am aiming for involves some foam baffling at the front of each chamber to remove straight lines for noise. This will then be assisted by the front door dampening any remaining sound. This takes away mounting the hard drive closer to the front. It may just sit on some foam, but I plan on giving the Stretch Magic a go somehow.
Going to auto parts store today looking for some uchannel type stuff for holes. Should've ordered it earlier
The styrene will be going in last once everything else is in place.
Progress is a bit slow as we live in a townhouse apartment, have neighbors, I do the noisy stuff when they are gone for a few hours at a time
I am taking plenty of pics...not som much in the metal working part though. Will get shots of the finished cuts before installing everything though. Also did a stupid yesterday: had the case upside down for some filing and then some drilling...on the worksurface...covered in metal shards....plastic on top looks a bit rougher than it did.
*sigh*
-
InfyMcGirk
- Posts: 78
- Joined: Mon Mar 16, 2009 2:06 pm
- Location: East Midlands, UK
D'oh. I removed the plastic top completely then glued it back on once I was finished. I don't think I did it for that reason, but I'm glad I did now!Also did a stupid yesterday: had the case upside down for some filing and then some drilling...on the worksurface...covered in metal shards....plastic on top looks a bit rougher than it did.
*sigh*
From a few feet away it's not noticeable really, and the thing will be under my desk anyway...but *I* will know it's scratchedblackworx wrote:Good work, awaiting pics.
D'oh. I removed the plastic top completely then glued it back on once I was finished. I don't think I did it for that reason, but I'm glad I did now!Also did a stupid yesterday: had the case upside down for some filing and then some drilling...on the worksurface...covered in metal shards....plastic on top looks a bit rougher than it did.
*sigh*
Lesson learned...serves me right for thinking I didn't need to clean the metal up just yet.
Think I'm just about done with the chopping...going to look around tomorrow for some u-channel type material, clean up the case, and then start installing. Pretty good idea of where all the cables are going and have a foggy idea of my hard drive suspension.
Removed the rear and upper fan grilles, I a) found a 120mm fan grill, and b) realized I won't have a fan right there in the back anyway so no finger chopping worries.
Drilled out the rivets for the lower chamber fan mount, played with those holes and drilled some more to come up with the suspension system. Wore out a couple grinding bits on the Dremel smoothing out the burrs.
Will put some pics tomorrow night or Saturday of the build process, will put the final build in the gallery.
My wife thinks I'm insane (well, more than usual anyway) 
Removed the rear and upper fan grilles, I a) found a 120mm fan grill, and b) realized I won't have a fan right there in the back anyway so no finger chopping worries.
Drilled out the rivets for the lower chamber fan mount, played with those holes and drilled some more to come up with the suspension system. Wore out a couple grinding bits on the Dremel smoothing out the burrs.
Will put some pics tomorrow night or Saturday of the build process, will put the final build in the gallery.
My wife thinks I'm insane (well, more than usual anyway)
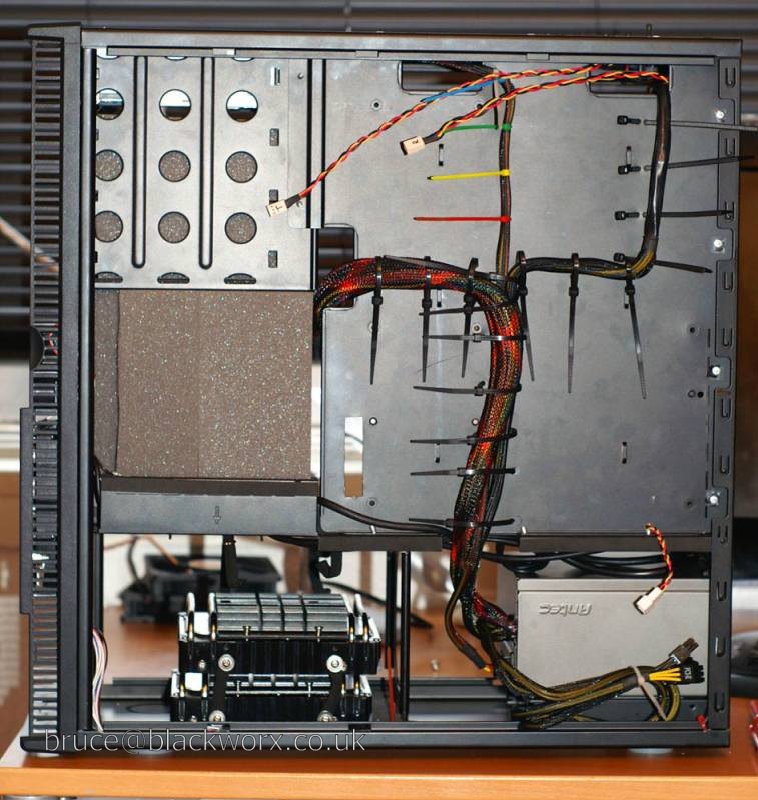
Pics of the process as promised, pretty rough looking currently but I have a feeling it's going to look *good* when it's done 
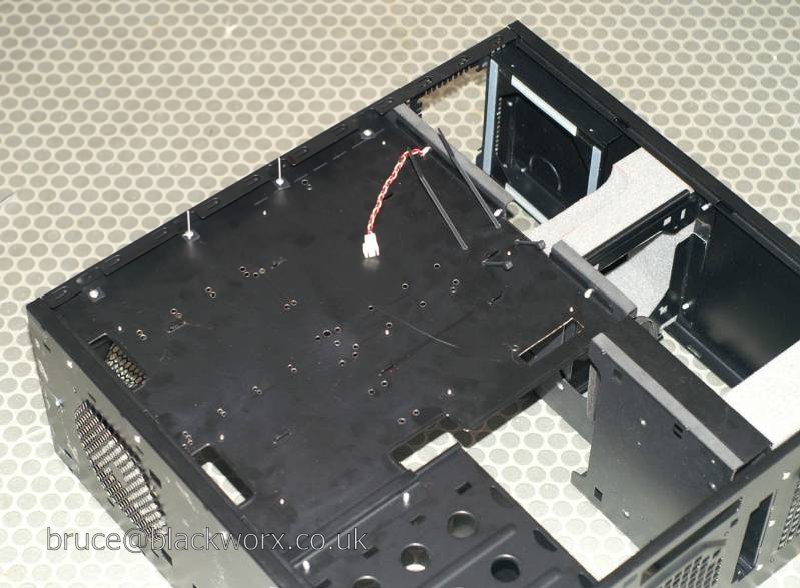
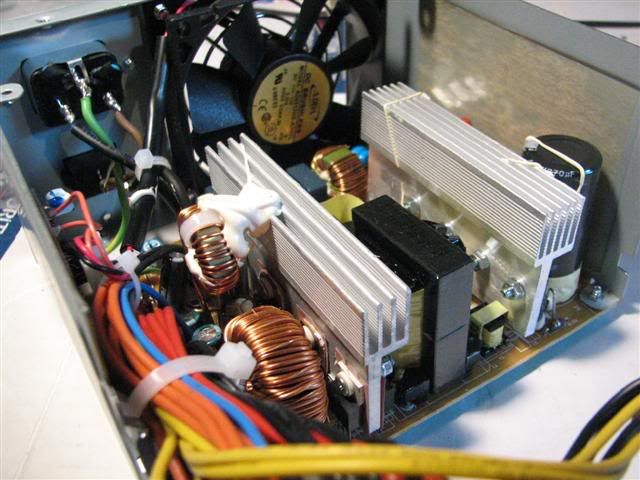
Always a good time hoping you discharged everything, swapped out the Adda fan for a Nexus:
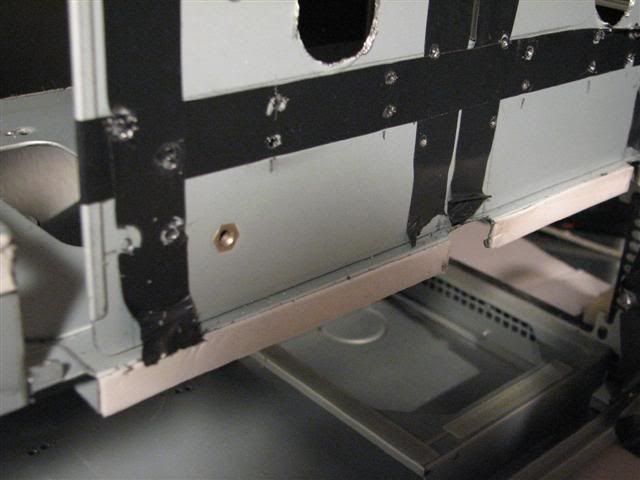
At the far left is where i cut out a piece next to the floppy bay, center is cutout for main atx and other power, far right is aux-12v cutout. File down nice and smooth after cutting with hacksaw.
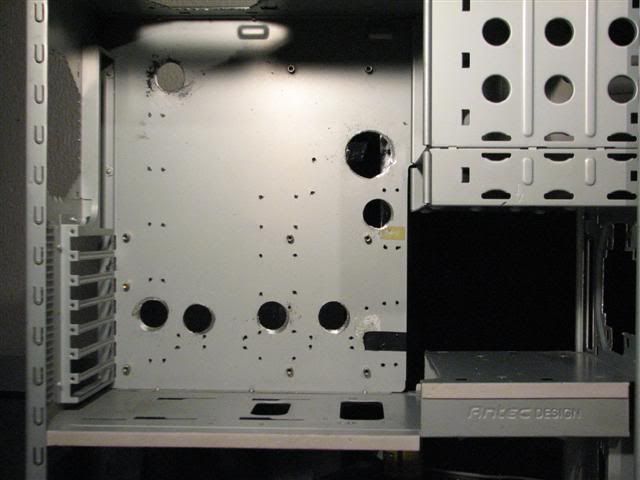
Using the holesaws, I found my drill has a wobble in the chuck (actually, I had kind of noticed it before but it has much less impact when just drilling). They don't cut straight down. Urgh. Can see the holes which will be used for tie down purposes also.
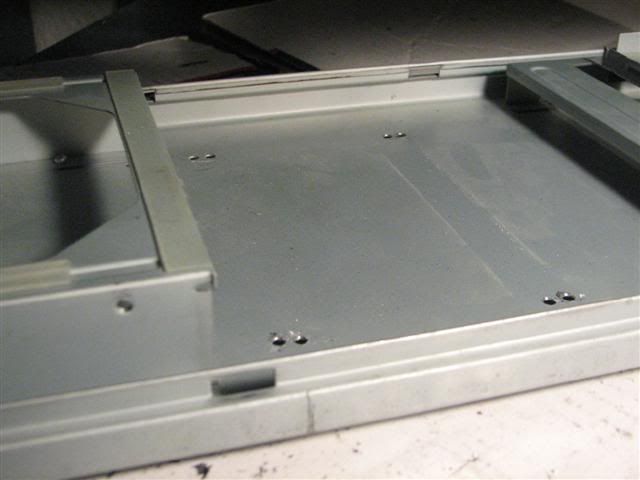
Power supply mount is to the left, I removed the center fan mount and drilled additional holes for a Stretch Magic suspension system (this far back so I can have some baffling in front of it). Hooooping it works with psu cabling not getting in the way.
Always a good time hoping you discharged everything, swapped out the Adda fan for a Nexus:
At the far left is where i cut out a piece next to the floppy bay, center is cutout for main atx and other power, far right is aux-12v cutout. File down nice and smooth after cutting with hacksaw.
Using the holesaws, I found my drill has a wobble in the chuck (actually, I had kind of noticed it before but it has much less impact when just drilling). They don't cut straight down. Urgh. Can see the holes which will be used for tie down purposes also.
Power supply mount is to the left, I removed the center fan mount and drilled additional holes for a Stretch Magic suspension system (this far back so I can have some baffling in front of it). Hooooping it works with psu cabling not getting in the way.
-
Bruce Banner
- Posts: 44
- Joined: Tue Mar 24, 2009 8:05 pm
- Location: San Francisco
Third pic, you can see it--it's gone. Upper=gone. Fronts=mostly gone except for filter attachment points.Bruce Banner wrote:dont 4get to hack the back exhaust port
While I wait for the U-channel stuff I plan on cleaning up the filter doors--luckily I have FOUR of them, they had two included with the replacement bezel a couple years ago.
A real fiddly PITA job if ever there was one imhoWhile I wait for the U-channel stuff I plan on cleaning up the filter doors
Good work so far. You have my sympathies re the drill chuck. I hate it when tools are slightly out of true or have play in them like that - makes using them unneccessarily difficult and frustrating!
-
Bruce Banner
- Posts: 44
- Joined: Tue Mar 24, 2009 8:05 pm
- Location: San Francisco
-
Rebellious
- Posts: 322
- Joined: Sun Dec 09, 2007 12:53 pm
- Location: EU, USA
Paint pen?! Wow, the stuff I learn here.
I bolted the stock 14cm blowhole fan on my black Lian-Li using shiny stainless steel bolts, and I thought that there must be some quick & dirty way to paint their little heads black.
So let's see now, Amazon has dozens of choices:
Sharpie Oil Based Paint Fine-Tip Markers
Sharpie Permanent Oil-Based Paint Markers
Sharpie Water-Based Paint Markers
Sanford Sharpie
Oil or water?
..
Forgot all about this today while I was out, thanks for reminding me (ignorance *was* bliss).Rebellious wrote:Paint pen?! Wow, the stuff I learn here.
I bolted the stock 14cm blowhole fan on my black Lian-Li using shiny stainless steel bolts, and I thought that there must be some quick & dirty way to paint their little heads black.
So let's see now, Amazon has dozens of choices:
Sharpie Oil Based Paint Fine-Tip Markers
Sharpie Permanent Oil-Based Paint Markers
Sharpie Water-Based Paint Markers
Sanford Sharpie
Oil or water?
..
Reason for putting something on the cut bits of metal is to prevent corrosion, not that I am exceptionally worried about it. Fun fact: did that when working in phone company Central Offices and building new racks and adding *stuff* like fiber, dsl equipment, etc. Cutting the threaded rod and oxbar to size they require you to paint over the exposed metal to prevent corrosion. Then again, no zip ties either, all hand sewn in place with wax string