220mm Fan Mods..Finishing the Project.

Control: management of fans, temp/rpm monitoring via soft/hardware

Moderators: NeilBlanchard, Ralf Hutter, sthayashi, Lawrence Lee

Bluefront
*Lifetime Patron*
Posts: 5316
Joined: Sat Jan 18, 2003 2:19 pm
Location: St Louis (county) Missouri USA

220mm Fan Mods..Finishing the Project.

Post by Bluefront » Sun Mar 11, 2007 8:42 am

Link to all photos from this almost completed project


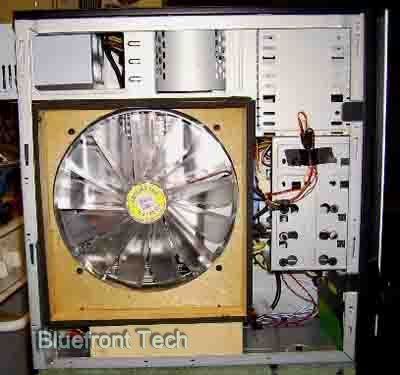
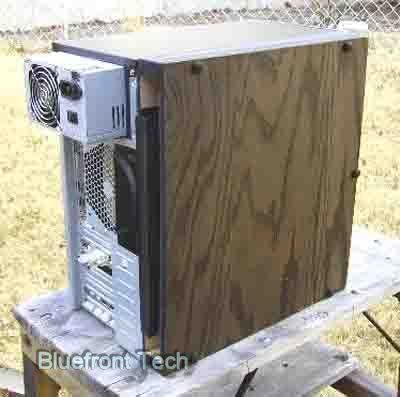
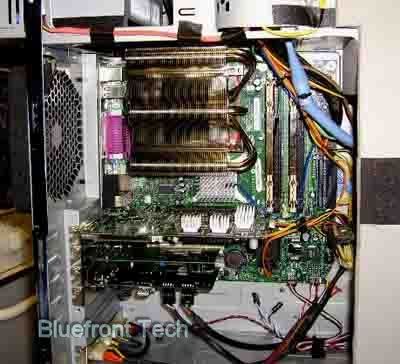
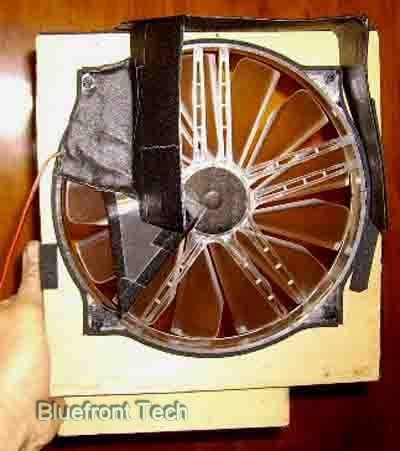
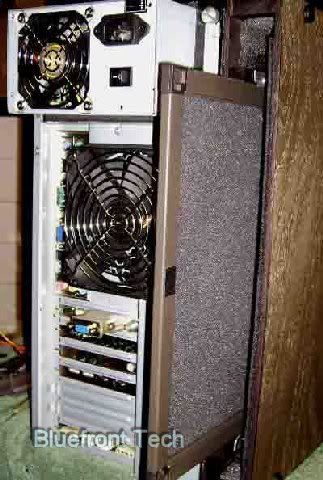
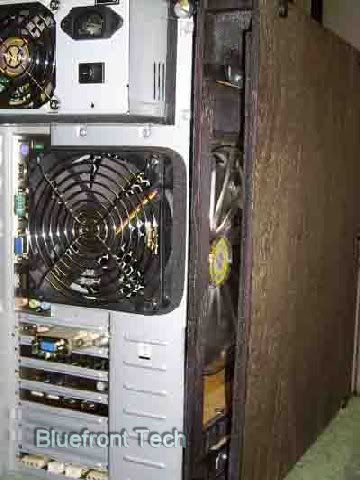
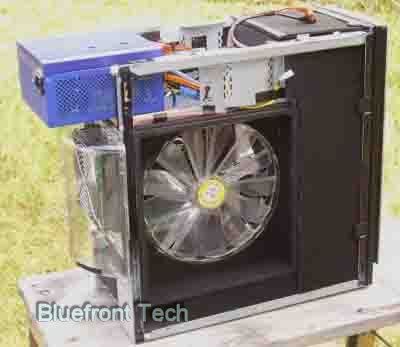
I've been playing around with a Xclio 220mm big fan for a few weeks now. It's been modded to fit an Antec NSK 4400 case. I had to change motherboards this week-end, because my previous test board bit the dust during a heatsink change. Right now I'm using a Shuttle ATX board, with a P4-2.6, and an ATI AIW 8500DV. The OEM Antec PSU is being used for now, with no other fans, just the big fan.

In this thread I'll post the various mods I'm trying specific to the big fans....I have two types, another one with only seven blades (not tested yet). I am trying to run this whole computer on the one big fan....later I'll switch to a fanless Zen PSU, and a hotter CPU. For now here are a few findings.

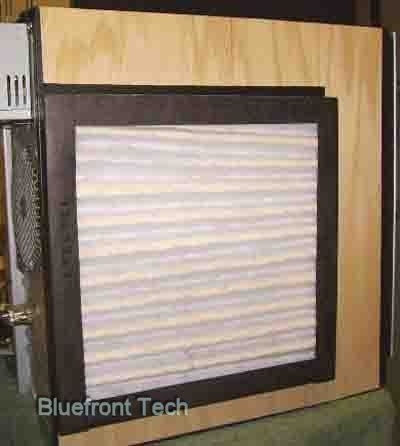
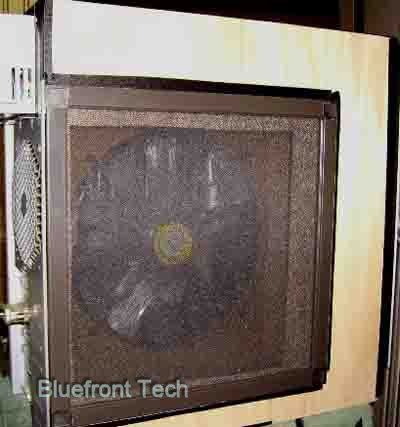
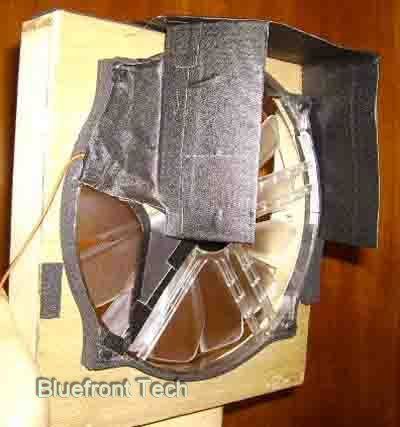
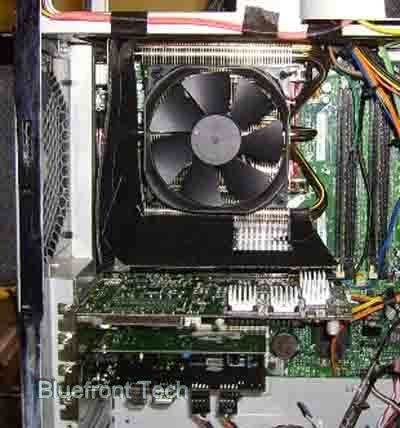
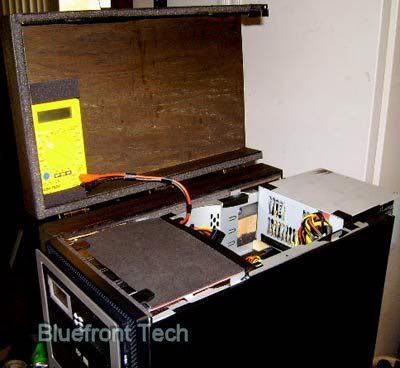
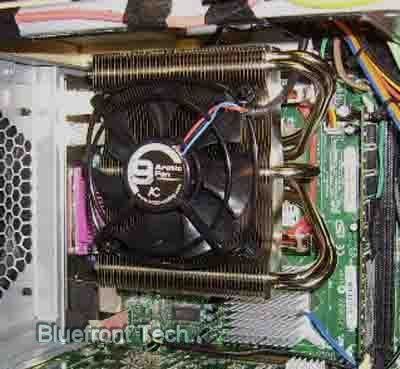
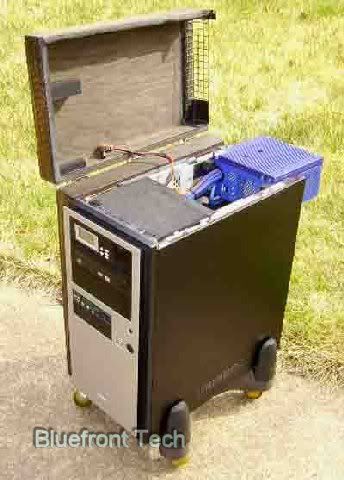
I have tried an XP-120 and a Big Typhoon heatsink with this setup.....the temperature results were similar. So for now I'm using the Big Typhoon (it's fan removed). The fan is soft-mounted in a wooden housing, placing it to within 1/8" of the heatsink. Here are some temperature results using no filter, a 12x12x1" furnace filter, and a DIY filter made of 5/16 screen frame with an AC foam filter. Later on this filter will be in a housing, with all the intake from the rear.

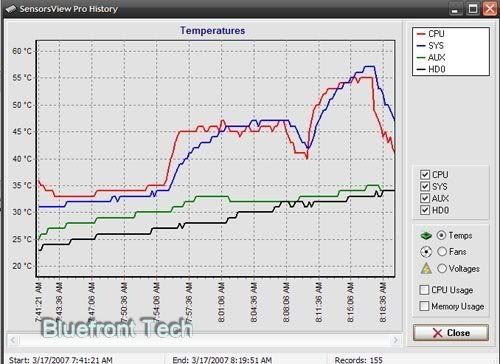
No filter with the big fan at 5V.....23C ambient.
idle temp......27C
max temp.....37C

Furnace filter with big fan at 5V.
idle temp.......31C
max temp.....46C

AC foam filter with the big fan at 5V.
idle temp......27C
max temp.....39C.

Obviously the furnace filter is restricting airflow quite a bit, compared to the AC filter. To achieve the same temps with the furnace filter, I have to raise the voltage to about 8V. Still it's pretty quiet.....more testing to come, along with some mods to the fan itself. Anybody using this fan, feel free to post any of your own mods/results.


Image

Image

Image

Image
Last edited by Bluefront on Sun Mar 25, 2007 4:12 pm, edited 4 times in total.

miahallen
Posts: 305
Joined: Thu Jan 18, 2007 10:31 pm
Location: Japan

cool project

Post by miahallen » Sun Mar 11, 2007 4:53 pm

Nice work, keep the results coming in, thanks! Any chance you could give us some quantitative audio tests, or some audio recordings?

Bluefront
*Lifetime Patron*
Posts: 5316
Joined: Sat Jan 18, 2003 2:19 pm
Location: St Louis (county) Missouri USA

Post by Bluefront » Sun Mar 11, 2007 5:37 pm

With the addition of the intake housing, which is lined with acoustic foam (last photo), this computer is much quieter than the ambient noise level of this house, I can no longer hear it at all. It would be futile to try to make an audio recording. Suffice to say......at 5V or less these big fans are hard to hear.

Bluefront
*Lifetime Patron*
Posts: 5316
Joined: Sat Jan 18, 2003 2:19 pm
Location: St Louis (county) Missouri USA

Post by Bluefront » Mon Mar 12, 2007 5:10 pm

I've been tweaking this setup the last few days. I finished the intake/muffler/filter housing, and did some minor ducting to the intake (I'll explain that later)......and the AS5 has setup. So I'm now working on the fan control. This board has no fan control, so I'll have to do an external solution. And here's the first problem (a good problem) with this fan. It will start up and run on less than 4V, so if your system can handle minimum airflow, you still have to find a controller that goes down to 4V or less. I want an automatic controller, based on CPU temperature, using an external sensor. Here's what I'm using for now.....might stay with it. An M-Cubed Fan-Amp. I can adjust the voltage way down, and the fan still starts. It gets a 12v blast for a second or so, and it's PWM........so the fan now is set to start and idle at 4V. (no PWM noise) At about 42C, the voltage rises to about 10V. I have to run two instances of CPUBurn for a long time to get the CPU this hot. Right now the ambient is 24C.......and I did a new install of XP. The voltage never got above 4V. This thing is quiet. I cannot tell if it's running at an idle.....I need to install an LED on the bezel to indicate voltage to the fan. Wish it had an RPM sensor... :(

Bluefront
*Lifetime Patron*
Posts: 5316
Joined: Sat Jan 18, 2003 2:19 pm
Location: St Louis (county) Missouri USA

Post by Bluefront » Thu Mar 15, 2007 7:43 am

More findings concerning fan speed. With the proper CPU heatsink, this computer can run on just the one big fan at 4V, but..... While the CPU temperature is ok, the rest of the board components run slightly hot. I hooked up seven temperature sensors various places in the computer (DD5). To get the NB and SB temperatures lower, as well as the fanless video card, I'm now running the big fan at about 6V.The sound level barely changed, but the temperatures were helped a bunch. Right now with an ambient of about 23C, the CPU idle temp is 31C, and it maxes out about 41C.

I also installed a back-up case fan. The 120mm rear case vent hole had been unused. I installed a Yate Loon there, blowing outward. The DD5 turns on this fan at about 7V when the CPU temp reaches 44C. Should the CPU temp reach 46C the big fan goes to 10V. With that much airflow, the CPU temp shoots downward. I'm still experimenting with fan speed settings....and probably will continue to do so till my new MB and hotter CPU arrive..... :D

miahallen
Posts: 305
Joined: Thu Jan 18, 2007 10:31 pm
Location: Japan

great results

Post by miahallen » Thu Mar 15, 2007 7:54 am

What's a DD5?

McBanjo
Posts: 671
Joined: Thu Dec 08, 2005 1:40 pm
Location: Sweden
Contact:

Post by McBanjo » Thu Mar 15, 2007 8:53 am

Got any rpm-numbers for the different V?

Bluefront
*Lifetime Patron*
Posts: 5316
Joined: Sat Jan 18, 2003 2:19 pm
Location: St Louis (county) Missouri USA

Post by Bluefront » Thu Mar 15, 2007 9:20 am

No....too bad. None of these 220mm fans has an rpm sensor. Felger Carbon has done some rpm testing using lights, but nothing I would enjoy setting up. The thing is so quiet at low voltages, it's very hard to tell the speed change going from 4v to 6v. I have to use a volt meter to set idle speeds. Right now the ambient is 23C.......I can change the idle speed using the FanAmp till the temp is about 31C, and at that point I'm right at 6V. Really that's only necessary.....being so precise......if you're anal about this sort of thing. :lol:

DD5......DigitalDoc5 is a 5 1/2" panel device with eight temperature probes, and eight fan connections. I can measure the temps of anything in the computer....it scrolls through all eight, then starts over. It can also turn on a fan at a particular temperature.

Link

Image

That's channel 2 @39C......you can see system voltages, and if a fan turns on that channel will blink. Many options with this thing. I did have to paint it black.....the beige version is still available. Get the "plus" model if you're interested.

Here's a photo with the top slid back. The DD5 is short, so you can shove all the unused wires, PSU wires, sensor wires, etc, behind the DD5. I like to use the top bay for this (if the top comes off). You can see the FanAmp controller in the center, and a fanmate in the photo, plus a bunch of wires.

Image

christopher3393
Posts: 289
Joined: Fri Sep 23, 2005 9:46 pm
Location: Bloomington, MN

Post by christopher3393 » Thu Mar 15, 2007 5:18 pm

Bluefront: I'm just really impressed with the work that you're doing and just hope that I can apply some of it to my 1st build: viewtopic.php?p=322015#322015
Any advice, especially big fan suggestions, appreciated.

Bluefront
*Lifetime Patron*
Posts: 5316
Joined: Sat Jan 18, 2003 2:19 pm
Location: St Louis (county) Missouri USA

Post by Bluefront » Fri Mar 16, 2007 2:51 pm

More changes....and a big one this time. I changed board and CPU. I'm now using an Intel D865GLC with one of the hottest 478 CPUs ever made, a P4-3.4 extreme edition. The Big Typhoon didn't fit too well, so I'm back to an XP-120. Since this heatsink is very short, I had to make a longer duct to fit it......forcing maybe 50% of the big fan airflow directly over the XP-120. Here are a few pictures of my first prototype.

Image

Image

Image

The duct is three-sided as you can see, and a tight fit around the heatsink. Look closely at the left side and you'll see the secondary air deflector....this forces airflow toward the front of the computer, directed at the hard drives. This helps HD temps a bunch. And here's some top views....

Image

Image

The first view has the PSU pulled out but still connected. About 1/2 of the heatsink fin depth is covered by the duct. The PSU still sticks partially out of the case, and had to be raised up about 1/8" to clear the XP-120...close fit. No temp tests yet.....but it looks good so far.

Bluefront
*Lifetime Patron*
Posts: 5316
Joined: Sat Jan 18, 2003 2:19 pm
Location: St Louis (county) Missouri USA

Post by Bluefront » Sat Mar 17, 2007 6:17 am

Image

That's the temp chart result of the first test with the new hot CPU. Using the Sandra burn-in prog for ten runs each (about 15min each, processor only), here are the results.....

Idle temps at 23C ambient....big fan @6V.

cpu.........36C
sys..........36C
aux.........32C
HD.........29C

50% CPU usage for 10 runs (the back-up YL fan turns on)

cpu........45C
sys.......47C
aux......32C
HD.......32C

100% cpu usage for 10 runs (the back-up YL fan is on, the big fan @6V)

cpu......55C
sys......57C
aux.....35C
HD......34C

The sys temp is a chip w/o heatsink at the upper right corner of the MB (windbond chip I think). Haven't figured out what the aux temp is measuring. I closed off the bottom of the duct for the test (will stay that way). Now the XP-120 is closed ducted from the heatsink, all the way to the big fan struts. The duct opens up slightly at this point, being about 1" wider at all sides than the heatsink. Obviously....a cooler running CPU will return cooler temperatures, at lower fan speeds. And I'm convinced a heatsink taller than the XP-120, closer to the fan.....will preform better with this big fan setup. I might try a Dominator next....maybe. :lol: Anyway, this setup is working ok for me, and very quiet even under stress. More testing and mods to come.

McBanjo
Posts: 671
Joined: Thu Dec 08, 2005 1:40 pm
Location: Sweden
Contact:

Post by McBanjo » Sat Mar 17, 2007 6:32 am

I belive AUX is the same as PWM

Bluefront
*Lifetime Patron*
Posts: 5316
Joined: Sat Jan 18, 2003 2:19 pm
Location: St Louis (county) Missouri USA

Post by Bluefront » Sun Mar 18, 2007 4:12 am

Here are a few better photos of the filter housing, showing how easy the filter is accessed, and how large it is compared to the 120mm YL back-up fan. I wish case makers would take notice of this setup......I wouldn't mind a bit if this setup were copied 100%. It works excellently. And if you don't need a filter, this setup deadens the intake noise of the big fan, enough that even at 12V, over 100cfm of airflow, you can live with the thing.

Image

Image

And in case you wonder how I get voltage readings from the big fan....here it is. I spliced the wire going to the fan, and pull the connector out through the USB access door of the DD5 (USB connectors were removed). I bought a cheap VOM from Harbor Freight, and made a permanently attached connection to the probes. I really only need to set this up for testing and final adjustments.

Image

psiu
Posts: 1201
Joined: Tue Aug 23, 2005 1:53 pm
Location: SE MI

Post by psiu » Sun Mar 18, 2007 5:32 am

Actually, I would guess that your temp labels are incorrect. The CPU and Sys temps are near identical, I would bet that one is the standard CPU temp and one is the core temp. If you can, put a load on the processor while watching temps, then kill the load. The core temp should drop very quickly back to its base idle temp while the standard cpu temp should drop relatively slowly.

*goes back and checks the posts again*

HA! theres a chart! I missed that the first time through :oops:

And I think it confirms my suspicions. I would say that what you have labeled as AUX is the actual case temp from that Winbond sensor. What you have as CPU is the actual core temp (notice how it responds first to temp variations--zooms up and down while the other lags) and the SYS temp is the standard CPU temp reading.

Can anybody else chime in on this?

Bluefront
*Lifetime Patron*
Posts: 5316
Joined: Sat Jan 18, 2003 2:19 pm
Location: St Louis (county) Missouri USA

Post by Bluefront » Sun Mar 18, 2007 6:04 am

I think the CPU line (red) is labeled correctly.....as the core temp. It shoots up the fastest when loaded. Eventually the sys temp gets slightly hotter. When the load is removed, the red line shoots down, faster than the sys temp. I'll see into this further with more testing.... :lol:

Bluefront
*Lifetime Patron*
Posts: 5316
Joined: Sat Jan 18, 2003 2:19 pm
Location: St Louis (county) Missouri USA

Post by Bluefront » Sun Mar 18, 2007 1:49 pm

I discovered this new board's own fan controller works very well.....starts off at 12v for two seconds, then drops back to 2.6V. As the cpu heats up, the header voltage rises....but not very fast. At 51C it is only at 4.5V. So I'm now trying out something new. I installed a 92mm fan in the center of the big fan duct, about 4mm from the XP-120. This fan and the rear YL case fan are now being controlled by the MB fan controller....wired in parallel. So they both are running at 2.6V most of the time. This new setup is going to require more testing.....but the ambient is way up today, so I'll wait for a cooler day to test. Interesting......
Last edited by Bluefront on Sun Mar 25, 2007 2:06 pm, edited 1 time in total.

Bluefront
*Lifetime Patron*
Posts: 5316
Joined: Sat Jan 18, 2003 2:19 pm
Location: St Louis (county) Missouri USA

Post by Bluefront » Mon Mar 19, 2007 3:21 am

Initial testing is promising with this new fan setup. I'd like to keep the max CPU temp around 50C without the big fan ramping up to max. I found the on-board fan control supplies too little voltage to the 92mm fan at any time. So now I'm experimenting with a constant voltage around 6-7V to the 92mm fan, and the big fan around 6.5V to start. The ideal setup would be the big fan staying at 6.5V as long as possible.....and only ramping up after a long burn session. Don't know yet if this is possible.

This new setup further confirms my suspicions that a taller heatsink, closer to the big fan, would work better than the short XP-120. This fan speed testing is difficult, time consuming.......made even more difficult by the Antec 380w PSU dropping .5V on the 12V rail during a CPU burn. This power-hungry CPU is to blame I guess. This time of the year in St Louis we have big ambient temperature swings. So I have to keep a constant watch on the ambient. Thus far my testing has all been done at 23C ambient.

When I locate my 92MM Nexus, I'll install that on the XP-120. At 7V that Nexus is very quiet....having that running at all times on the XP-120 won't increase noise levels by very much. More testing to come.....

Bluefront
*Lifetime Patron*
Posts: 5316
Joined: Sat Jan 18, 2003 2:19 pm
Location: St Louis (county) Missouri USA

Post by Bluefront » Tue Mar 20, 2007 6:56 am

Ok....I've got the 92mm Nexus mounted to the XP-120, using short rubber hoses to soft mount the thing, and zip-ties slipped between the fins. This is a much more secure mount method than the OEM wire clips. And I opened up the duct over the NB area......dropped the NB temps about 3C. I also cut the outer frame corners off the Nexus, giving better airflow to the fan. When I first started this new setup, I thought the Nexus wasn't running. Even at 12V I cannot hear the thing.

Image

I won't bore you with more temp testing....which is on-going. But it seems the best setup is to run the Nexus at about 7-8V, and the big fan at 6.75V. At an ambient of 23C, this keeps the P4-3.4 Extreme Edition about 52C max. Much more than that temp and the big fan ramps up. Right now I'm almost satisfied with the thermal performance. So much so in fact, I'm now using a somewhat more restrictive (better) filter.....this is also an AC filter, but much more restrictive looking than the previous foam filter. Anyway....the temps showed almost no change over the foam filter, so from now on all testing will be done with this filter over the big fan.

Image

The next big step in this big fan project will be a test with a fanless PSU (new Fortron Zen 400w), and an Aerocool Dominator heatsink, using the same big fan and Nexus (actually I want to eliminate the Nexus fan, and I think the taller Dominator will make this possible).....that is if I can get the dominator to fit. Looks like I'll need to make some custom brackets to fit this MB. The parts are on their way......

Bluefront
*Lifetime Patron*
Posts: 5316
Joined: Sat Jan 18, 2003 2:19 pm
Location: St Louis (county) Missouri USA

Post by Bluefront » Wed Mar 21, 2007 7:40 am

Next step.....a new top designed for a fanless Zen PSU. I ordered the new Zen 400w when it became available. Since the big fan provides a positive pressure case, a fanless PSU sitting on the top of the case is a natural. But this Antec 4400 is a pretty tight fit in it's stock form. So I made a new top which will allow plenty of airflow over the top heatsink of the new Zen. When the PSU arrives I'll construct a tighter opening on the top, so all the exhaust goes directly over the top heatsink. This hinged top is attached to the filter housing, and held tight to the case by one thumb-screw in the stock place. I semi-permanently installed the VOM in the top.....makes fan voltage adjustments easy. More fun to come.....

Image
Last edited by Bluefront on Sun Mar 25, 2007 2:04 pm, edited 1 time in total.

McBanjo
Posts: 671
Joined: Thu Dec 08, 2005 1:40 pm
Location: Sweden
Contact:

Post by McBanjo » Thu Mar 22, 2007 6:56 am

Here is a little thought I have for 220mm fan and use of a towercooler:
http://hem.bredband.net/gabsta/Blandat/bigfan.JPG

Bluefront
*Lifetime Patron*
Posts: 5316
Joined: Sat Jan 18, 2003 2:19 pm
Location: St Louis (county) Missouri USA

Post by Bluefront » Thu Mar 22, 2007 4:14 pm

Humm....McBanjo that would make for a very wide case, if I'm seeing that drawing right.

I may have found the magic bullet for my setup. I wanted a 92mm fan sitting in the middle of the duct to this XP-120, blowing toward the heatsink. And I wanted the frame to block as little airflow as possible. Here's what I'm testing right now.....a 92mm Arctic Cooling fan with the attachment frame removed. It's held to the XP-120 with rubber hose/spacers, and zip ties. I spaced it as close as possible to the heatsink. Due to the design of the XP-120, the blades can be spaced below the top surface of the fin pack....similar to a Zalman 7000.Anyway the initial testing looks great....it cools much better than the 92mm nexus. (the main duct to the big fan is absent from this photo). more to come...... :D

Image

This particular fan is available for $2.50....Here
Last edited by Bluefront on Sat Mar 24, 2007 2:30 am, edited 1 time in total.

McBanjo
Posts: 671
Joined: Thu Dec 08, 2005 1:40 pm
Location: Sweden
Contact:

Post by McBanjo » Fri Mar 23, 2007 7:06 am

Not really, only slightly wider than a normal case. It would be atleast 220x305 (fan wide+MB length) internal so maby 10mm more per side external. One option would be to tilt the fan a bit to get a slimmer case and blow more onto the MB.
Hight would be something like 500-600mm tho


Doesn't a 92mm fan on the heatsink ruin the point with a huge 220mm fan?

Bluefront
*Lifetime Patron*
Posts: 5316
Joined: Sat Jan 18, 2003 2:19 pm
Location: St Louis (county) Missouri USA

Post by Bluefront » Fri Mar 23, 2007 6:42 pm

Ok....let me try to explain this big fan, and it's effects in a case. You're dealing with a certain CFM, depending on the voltage to the fan. But the airflow is dispersed over a much larger area than that same CFM coming from a smaller fan....that fan turning a higher rpm of course. The result is a lower airflow in any one spot...say the CPU heatsink......than if all the airflow from a smaller fan blew on the heatsink.

I'm not sure if I can explain it correctly......but the case gets plenty of airflow at low noise levels, but not the sort of ideal airflow that cools CPU heatsinks very well. If the heatsink were taller, and closer to the big fan.......I don't think the 92mm fan would be necessary (assuming the same hot CPU). As it stands the big fan is cooling the entire case well at low voltage/rpms. The 92mm helps with the specific cooling of the CPU. Anyway......running that Arctic Cooling fan about 7-8V (1200rpms) seems to do the trick. More testing/adjustments to follow.
Last edited by Bluefront on Sat Mar 24, 2007 9:10 am, edited 1 time in total.

Iateronmly
Posts: 17
Joined: Wed Feb 28, 2007 7:51 am
Location: Ninilchik Alaska
Contact:

Post by Iateronmly » Fri Mar 23, 2007 11:17 pm

As another big fan fan-atic I know what you're saying. You've got two cooling concerns, total exchange rate and spot cooling. The trick is finding the sweet spot. Sometimes you can duct the main intake and exhaust well enough to get proper spot cooling, sometimes you'll get better results both noise wise and cooling by combining them.

Bluefront
*Lifetime Patron*
Posts: 5316
Joined: Sat Jan 18, 2003 2:19 pm
Location: St Louis (county) Missouri USA

Post by Bluefront » Sun Mar 25, 2007 2:31 pm

It's getting close to the finish. The fanless Zen PSU is installed and running cool. The removal of the original PSU and it's exhaust fan hasn't affected any temperatures at all....far as I can tell.

And I changed fan controllers for the big fan. It's now being controlled by a NoiseMagic NTM2. This gives a temp curve from 30-50C at 5-12V. At the idle temp of 36C, the big fan gets 5.7V. At max temp of 49C (CPUBurnx2) the big fan gets 8.5V. It has a nice, smooth, stepless voltage rise....I think it's perfect for this setup. The AC 92mm fan is set at 1200rpms.....can't really hear it from the front.

The big fan housing is now completely covered in acoustic foam....front and rear. And I finished up the interior dampening. I was going to try an Aerocool Dominator in this setup. But it's working so well right now, that mod is on hold. I even finished the wood-work with some varnish.

I now can say this is my most unique computer project. This also proves you can make a quiet computer with a very hot CPU, and completely filter all the intake air. I'm well pleased with the result of this big fan project. You guys need to get on the ball and try out this new King of the Fans. :lol:

Image

Image

Image

Link to all photos from this project

Many thanks again to Felger Carbon for getting me started with this project. :D
Last edited by Bluefront on Mon Mar 26, 2007 3:56 am, edited 3 times in total.

McBanjo
Posts: 671
Joined: Thu Dec 08, 2005 1:40 pm
Location: Sweden
Contact:

Post by McBanjo » Sun Mar 25, 2007 2:47 pm

You guys need to get on the ball and try out this new King of the Fans. :lol:
I'll sue you for being an inspiration :wink:
220mm is to big for me right now but I wouldn't mind 180mm fans

Bluefront
*Lifetime Patron*
Posts: 5316
Joined: Sat Jan 18, 2003 2:19 pm
Location: St Louis (county) Missouri USA

Post by Bluefront » Mon Mar 26, 2007 2:52 am

FWIW......Here's a link to the NoiseMagic fan controller I'm using with the big fan. The big fan wire connector had to be modified to fit this 3-pin controller. Also...I wanted the controller sensor to be right on the hottest part of the CPU. So I soldered an extension wire on the sensor. The sensor is placed in the lower fins of the XP-120, close to the CPU core. This gives a temperature very close to the core temperature. The voltage rise with this controller is so smooth, you can barely tell the slight noise increase as the big fan goes from about 5V to about 8.5V. Thus far the cpu temp has never gone high enough to cause the big fan to hit 12V. There is another model of this controller, an NTM3, which has a slightly different temperature range.....and would cause the big fan to run at a slightly higher voltage. But I'm sticking with the NTM2 for now.

Image

The 92mm AC fan is on a manual controller. So depending on the rpm of this 92mm fan, the big fan controller responds differently. The two fans work well together. In really hot summer temperatures, I'll probably adjust the AC fan to run maybe 1400rpms or so, up from the 1200rpms it is currently running....24C ambient these last few days.

McBanjo
Posts: 671
Joined: Thu Dec 08, 2005 1:40 pm
Location: Sweden
Contact:

Post by McBanjo » Mon Mar 26, 2007 9:36 am

A friend will help me build something like that. Then I can custom it to fit my needs. I'll try to post it.
Cheaper and more fun :wink:

Kremmit
Posts: 116
Joined: Fri Dec 15, 2006 11:27 pm

Post by Kremmit » Mon Mar 26, 2007 7:18 pm

Bluefront wrote:You guys need to get on the ball and try out this new King of the Fans. :lol:
If only there were a good way to get an Xclio fan without buying a whole case.

Felger Carbon
Posts: 2049
Joined: Thu Dec 15, 2005 11:06 am
Location: Klamath Falls, OR

Post by Felger Carbon » Tue Mar 27, 2007 12:33 am

Kremmit wrote:If only there were a good way to get an Xclio fan without buying a whole case.
$20 here. Keep in mind this fan is not something one tucks out of the way in an existing case. Unless (like Bluefront) you have extensive DIY skills and the workshop tools to back up that knowhow, buying the fan already mounted may be your best path.

Post Reply