Lian Li PC-A7110 with much improved air flow (upd 11/06/08)

Show off your quiet rig.

Moderators: NeilBlanchard, Ralf Hutter, sthayashi, Lawrence Lee

Post Reply
QuailRider
Posts: 11
Joined: Thu Oct 09, 2008 8:53 pm
Location: Canada

Lian Li PC-A7110 with much improved air flow (upd 11/06/08)

Post by QuailRider » Thu Oct 09, 2008 11:12 pm

After spending a lot of time researching the perfect case for my next build, I've settled on the Lian Li PC-7110. A good review of this case can be found here. The thing is, while Lian Li cases look great and have top of the line build quality, more often than not their cases sacrifice cooling and noise for looks. I chose this case because it was the closest to what I was looking for in terms of layout. All that's needed is a little nip and tuck :twisted:. The goal of this mod is to keep things cool and quiet using low rpm fans that meet minimal air flow resistance.

Here are a few of ClubOC's pics of the default case, because I forgot to take some pics before I started ripping the case apart :roll:. I'd like to draw your attention to the front air intake. The front bezel looks fantastic, but the front air intake is really obstructed, as we will see when we start taking the case apart.
Image Image Image

Here are a few shots of the stock interior (from Lian Li's site):
Image Image

Note that cold air has to travel through a horizontal grill, a perforated metal sheet, another horizontal grill with even smaller openings than the first one, another (!) perforated sheet, the air filter, both sides of the hard drive cage, and finally more horizontal slats of the (useless) expansion card holder :shock:. No wonder Lian Li decided to use four intake fans. Taking the case apart, here's all the metal that's in the way of getting cold air into the case, and what that looks like when stacked. If you can't see through the layers, how are you going to get air through it?
Image Image

First lets start with the door. Look closely and you'll see that it's actually composed of multiple aluminum pieces joined together with screws, not rivets. That makes modding the door very easy. Simply remove the 10000 screws without losing any of them, and take out the perforated metal screen and internal grill. I left the external grill in place, because it adds to the structural integrity of the door, looks good, and is open enough that the air can still get through easily.
Image Image
Last edited by QuailRider on Wed Nov 05, 2008 8:55 pm, edited 2 times in total.

QuailRider
Posts: 11
Joined: Thu Oct 09, 2008 8:53 pm
Location: Canada

Post by QuailRider » Thu Oct 09, 2008 11:45 pm

Now it's time to tackle the hardest part of the mod, because one slip and the front of this $300+ case is toast. I want to cut out the perforated metal grill covering the two 120mm intake fans. Now a lot of people out there would immediately reach for a Dremel for this job. Well, stop right there! I like Dremels as much as the next guy, but they are NOT very good for cutting perfectly straight lines. Yes, you can do it, but at considerable risk of an irregular cut or nick in the metal. A much better tool is a jig saw. Bosch make the best jig saws, for those who are interested. I used a fine metal cutting blade. To guarantee a perfect cut, I spent 5 minutes and whipped up a straight edge jig out of MDF. This is a jig saw variation of the classic circular saw jig, as discussed here.

Image Image Image

I was very pleased with the results. Very straight and square, and a lot easier than I thought it would be. OK, I can stop sweating now. Hard part over. After a bit of light filing by hand, I applied a thin coat of flat black model paint to the edge to blend in with the anodized surface.
Image Image

Now for the replacement screen. I wanted something that was open enough to allow the best airflow, but not so big that little fingers could get through it. My first thought was hex mesh, but I don't have a source in Canada and didn't want to pay a lot for shipping. I searched various places (Walmart, Staples, Canadian Tire, kitchen store etc.), and finally found this little darling. Hideous, isn't it? Some sort of phone stand. Yuck! This was one of the few items I found with a diamond pattern wire mesh with large openings. 95% of the IKEA wannabe crap out there uses a finer type of mesh. This thing is exactly what I needed. Let's put it out of its misery.

Now anything can cut this, as it's just a fine wire mesh after all, and we're not going to see the edges. Dremel, wire cutters, tin snips, whatever. I chose a table saw with an 80 tooth blade for the initial cuts, and a mitre saw for the cross cuts simply because I had the tools available and they cut a straight line fast. Metals are hard on the blades, but it's thin wire, so they went through it like butter. I find that a scrap of MDF is very useful for stabilizing thin materials during cutting, and keeps your hand well away from the blade.
Image Image Image Image

I attached the mesh to the bezel using black silicone I had on hand. It's resilient, and keeps the mesh from rattling. You won't see the blobs. I'm very pleased with the results.
Image Image Image

QuailRider
Posts: 11
Joined: Thu Oct 09, 2008 8:53 pm
Location: Canada

Post by QuailRider » Fri Oct 10, 2008 12:06 am

Now on to the case frame. The two 120mm intake fans have an aluminum cross that's not serving much purpose other than to support the filter pads. I won't be using filter pads, and I want to minimize the shiny aluminum that's visible through the bezel, so lets get rid of them using the jig saw.
Image Image

The power supply base has a fine metal screen attached. :x Why do you do these stupid things Lian Li? All power supplies have grills on their intake fans already. Besides, no one will see the damn thing once a power supply is sitting on it. It may seem like a small point, but it's a fine mesh, and probably restricting the surface area of the opening by 30%. Ugh. It's rivetted in place. A 1/8" drill bit takes out the rivets in seconds. If you've never drilled out a rivet before, you want to place the drill on the flat side of the rivet, not the raised side. It's easier that way.
Image Image

OK, this next mod is more for looks, but it's nice to be able to slide your pc around when you need to. The stock feet look pretty good, but I noticed on the Lian Li web site that they sell wheels as an after market item. I had a previous Lian Li case that used those exact same wheels. I checked, and yep, this case has the exact same hole placement for wheels as the old case. So I just swapped the feet for the wheels. Looks really nice. Hey, Lian Li, at this price wheels should be included! Hint, hint...
Image Image Image
Last edited by QuailRider on Fri Oct 10, 2008 10:06 am, edited 4 times in total.

QuailRider
Posts: 11
Joined: Thu Oct 09, 2008 8:53 pm
Location: Canada

Post by QuailRider » Fri Oct 10, 2008 12:29 am

Moving on to the rear exhaust fans. The one over the motherboard is ok as is, once the internal fan grill was removed. The top fan on the other hand needs a bit of work. The first photo is a top down shot showing a ~50% solid perforated sheet between the drive cage, fan, and motherboard. I'll use a Dremel to cut out a bigger opening, as it's too confined to use the jig saw. Next, the fan grill. It's more constricting than I'd like. A bit of jig saw work opens it up nicely, making room for a standard 120 mm wire fan grill instead. Much more open now.
Image Image Image Image Image

There will be more outflow fans than intake fans, once you take the power supply and video card fans into account. Therefore the case interior has a good chance of being in a negative pressure gradient. That means any open grills will be sucking in air. Well, my case is going to be under a desk, with the back facing a wall. There's going to be a lot of hot air at the back of the case, and I don't want any recirculation of hot air through those rear grills. The easiest way of covering them was with foil duct tape (you can see the roll at the lower right). Note: this is NOT regular duct tape, which is actually useless for ducts, and should be banned from that aisle of the hardware store. METALLIC duct tape is the real stuff. If neatly applied, it actually blends very nicely with the back of the case. The bright lights emphasize it, but in regular lighting you can hardly see it back there. It's malleable as well, so light pressure with your finger makes it take on the contour of the underlying grill for added aesthetics.
Image

Another minor fault of this otherwise very nice case is an incredible stupid location for the "front panel" ports. They put them on the top of the case. How many people put their full tower case under their desk? And with a full tower case, how close is the top of the case to the underside of the desk? I rest my case, your honor. So I unscrewed the thick bundle of wires from the case lid, and secured the metal cover in place with some glue. I'm going to go with a 3.5" bay based module made by Silverstone instead.
Image Image Image
Last edited by QuailRider on Fri Oct 10, 2008 7:17 am, edited 1 time in total.

QuailRider
Posts: 11
Joined: Thu Oct 09, 2008 8:53 pm
Location: Canada

Post by QuailRider » Fri Oct 10, 2008 12:54 am

Well, that's it. It's a subtle mod, but the airflow is much improved, and truth be told, I like the look better than the original. A bit more industrial. I put the fan filter frames on to break up the appearance of the underlying fans and shiny aluminum, but left the filters themselves off. They don't do much other than add to air resistance. I'll just take a can of compressed air to the interior every few months. The fans will be controlled by a Scythe KazeMaster fan controller to dial in a speed that optimizes noise versus heat.
Image Image Image Image

The parts for the new machine are coming in a few days. Can't wait. I'm going to ditch the sata hot swap cage for now. It just gets in the way. The goal is quiet. RAID arrays are not quiet. That's what servers and ethernet are for. I plan to just suspend the hard drive in the top posterior drive cage and call it a day. Hope you enjoyed the build. Comments welcome.
Image Image

that Linux guy
Posts: 213
Joined: Thu Mar 20, 2008 8:51 am
Location: In the server room, playing Trackmania

Post by that Linux guy » Fri Oct 10, 2008 2:02 am

WOW :shock: :shock: :shock:

Quailrider, you do some amazing work. First of all, that case is beautiful. And most mods don't turn out looking so professional. A big congrats to you for not hacking the shit out of your beautiful Lian Li case for a couple extra CFMs.

Second, your camera work looks quite nice. If you've got a decent camera, you've got some amazing photography skills. If you've got a top-notch camera, you still have good photo skills.

I like your mods and can't wait to see more from you. Awesome work, again.

-Andrew

QuailRider
Posts: 11
Joined: Thu Oct 09, 2008 8:53 pm
Location: Canada

Post by QuailRider » Fri Oct 10, 2008 7:33 am

that Linux guy wrote:WOW :shock: :shock: :shock:

Quailrider, you do some amazing work. First of all, that case is beautiful. And most mods don't turn out looking so professional. A big congrats to you for not hacking the shit out of your beautiful Lian Li case for a couple extra CFMs.

Second, your camera work looks quite nice. If you've got a decent camera, you've got some amazing photography skills. If you've got a top-notch camera, you still have good photo skills.

I like your mods and can't wait to see more from you. Awesome work, again.

-Andrew
Thank you for your compliments. Yes, when you spend this kind of money on a case, the last thing you want to do is start hacking into it without some careful planning. The camera was just a simple Cannon point and shoot. The lighting in my workshop is not very good, so I am lucky that the shots turned out as well as they did. I used two old pole lamps with 23w CF spiral bulbs aimed at either side of the case, which was placed on a white bed sheet. I then took a ton of pics, and culled the ones that didn't turn out (which was most of them). All hail the digital camera for its ability to allow you to quickly delete your mistakes.

thejamppa
Posts: 3142
Joined: Mon Feb 26, 2007 9:20 am
Location: Missing in Finnish wilderness, howling to moon with wolf brethren and walking with brother bears
Contact:

Post by thejamppa » Fri Oct 10, 2008 8:10 am

Very good job and as already saif, very professional work. That case is extremely beautiful and you have just made that case a slightly more beautiful, with improved airflow.

Now, if you plan your cablegami aswell and make it as well as you have plan and made the mods for the case, I would dare to say, you very well might have one the most beautiful rigs in the SPCR, which is also SPCR quiet.

Its always nice to see well made projects like this. Keep us updated and remember to post as the ready. I just want to see your whole system ready ^^

sanse
Posts: 399
Joined: Thu Dec 22, 2005 9:48 am
Location: Netherlands

Post by sanse » Sat Oct 11, 2008 10:25 pm

nice work.

however one remark: i also started without any filters in my rig

viewtopic.php?t=47722

you will be amazed how much dust will accumulate inside after some time.

;-)

and how hard it will be to get that dust out. especially from fans and heatsink-ribs.

QuailRider
Posts: 11
Joined: Thu Oct 09, 2008 8:53 pm
Location: Canada

Post by QuailRider » Tue Oct 14, 2008 9:18 pm

sanse wrote:nice work.

you will be amazed how much dust will accumulate inside after some time.

;-)

and how hard it will be to get that dust out. especially from fans and heatsink-ribs.
True enough. I've got two computers (a fileserver and an OpenBSD firewall box) that run 24/7, and are located in the room next to the workshop. They do indeed take in a fair bit of dust that wanders in from the shop. Every six months or so I take them outside and blast them with a blow gun (with low psi of course):

Image Image

After the billowing clouds of dust subside, everything is as good as new. I would argue that those sponge air filters would clog a lot quicker and reduce airflow a lot more than simply allowing the dust to enter the case and get rid of it a couple of times a year.

QuailRider
Posts: 11
Joined: Thu Oct 09, 2008 8:53 pm
Location: Canada

Post by QuailRider » Wed Nov 05, 2008 9:23 pm

Ah, there's nothing quite like parts arrival day!

Image

Hot heat pipe action. Bow chicka bow wow!

Image

Now to suspend the WD Velociraptor HD in the upper rear drive cage. As per SPR's review, these drives are amazingly quiet despite also being one of the fastest consumer drives available. I just wish they weren't so damn expensive. After removing the HD heat sink with a torx screwdriver, I attached 1/4" nylon cable clamps (available in the electronic section of Home Depot). Holes were drilled in the top and bottom of the drive cage, and 6 separate lengths of 1/8" thick bungee cord tied in place (3 up and 3 down). These cords will hold the Velociraptor, as well as a 3.5" mass storage drive (not shown in pics).

Image Image Image

Here is the first drive suspended. The foam blocks aren't so much for sound absorption as they are to keep the drives from banging into each other or the side rails, should the case need to be moved.

Image Image

I found out the hard way that once the motherboard is installed, it is impossible to reach screw holes at the back that hold the rear drive cage in place. Rather than be forced to remove the motherboard every time I needed to swap drives, I just used zip ties.

Image

The Scythe fan controller includes 4 temp monitors. I've attached the probes with a small piece of foil tape, which works well and is easy to apply. Clean up glue residue with mineral spirits if you need to move them. Probes have been placed on the back of the graphics card, northbridge and cpu heatsinks, and hard drive.

Image

QuailRider
Posts: 11
Joined: Thu Oct 09, 2008 8:53 pm
Location: Canada

Post by QuailRider » Wed Nov 05, 2008 9:43 pm

The system is complete, and it's time for the beauty shots. I'm not anal about the cables, as they're not seen normally. I'd be more fussy if there was a case window, but windows don't appeal to me. The cables are all tied up and tucked out of the way of the air flow, which is all that matters to me. The system is really quiet, to the point that I need to look at the power LED to tell if it's turned on. I can't emphasize enough how quiet the Velociraptor drive is. I own the previous gen Raptor as well, and the noise difference is day and night.

I'm presently running the Q9650 @ 3.8GHz 420 MHz FSB, and the system runs very cool. The 120mm stock Lian Li fans are dialed in to run at ~700 rpm. The front air intakes really suck in the cool air, yet do so very quietly. The only component which keeps this system from being completely silently is the ATI Radeon 4870X2. It's actually pretty quiet during general use, but the fan ramps up annoyingly during games. It's a sacrifice I'm willing to make for the sake of decent gaming performance.

Image Image Image
Image Image Image

bzoler
Posts: 10
Joined: Thu Mar 30, 2006 11:08 am

Post by bzoler » Wed Aug 05, 2009 12:20 am

hi everybody an especially QuailRider

I'm planning to buy a Lian Li PC-7110 or Lian Li PC-7110B (by the way does somebody know what's the difference between the two?)

I would like to ask you if you are still happy with your Lian Li A7110 case
because I have read about the aluminium cases that it's very difficult to have a silent system with one

and also that the silent solution on the A7110 is more gadget than really efficient (like the plastic for in the hdd rack and also the foam damping)

QuailRider
Posts: 11
Joined: Thu Oct 09, 2008 8:53 pm
Location: Canada

Post by QuailRider » Thu Aug 06, 2009 10:48 pm

bzoler wrote:hi everybody an especially QuailRider

I'm planning to buy a Lian Li PC-7110 or Lian Li PC-7110B (by the way does somebody know what's the difference between the two?)

I would like to ask you if you are still happy with your Lian Li A7110 case
because I have read about the aluminium cases that it's very difficult to have a silent system with one

and also that the silent solution on the A7110 is more gadget than really efficient (like the plastic for in the hdd rack and also the foam damping)
I've been very happy with my PC-A7110. It's the best case I've owned over the years. But... I wouldn't be satisfied with an *unmodded* PC-A7110. As I note in the beginning of the thread, I purchased this case for it's layout, looks, and potential for low airflow restriction. In the stock form, I think the front SATA HD rack with 4 fans and all those extra grills is just plain stupid. Fortunately, it's easy to remove the offending bits if you're brave enough to take drill and saw to a $350 case.

The side panel padding does help. You're right that in general aluminum is more difficult to keep quiet. Lian-Li's choice of HD mounting is moot: regardless of plastic rails or rubber grommets, the only solution for the silent pc crowd is HD suspension. I like the cable tie + bungie cord method shown above for it's ease of installation.

The "B" designation on the end of Lian-Li model numbers generally means black versus silver cases (not sure in this particular case, so check with Lian-Li's web site for details).

I guess what it boils down to is this: would I buy this case if I was only going to remove the SATA rack and leave all the grills alone? No, I wouldn't. There's too much airflow restriction in my opinion, necessitating too many fans or too high fan rpm for proper cooling. If silence is your goal, then find a case with wide open grills, direct air paths from front to rear, bottom to top, suspend noisy parts whenever possible, and dampen what you can't suspend. If you don't mind removing those grills, then the PC-A7110 becomes a really nice quiet case.

bzoler
Posts: 10
Joined: Thu Mar 30, 2006 11:08 am

Post by bzoler » Fri Aug 07, 2009 3:16 am

thanks for the informations

bzoler
Posts: 10
Joined: Thu Mar 30, 2006 11:08 am

Post by bzoler » Thu Aug 13, 2009 3:45 am

I would like to ask you one more question

You can read about aluminium and silent systems plenty stuff here and elsewhere but I'm not sure most of the people who wrote about it really know what they are talking about or if their knowledge is up to date or simply they are only repeating what they have read somewhere else

one of the generalities you read about aluminum it is you have to put heavy dampening material on the panels in order to avoid resonance,
is it still true with today Lian Li cases?

it seems to me you didnt mod your case this way at all and have succeeded with your goal

QuailRider
Posts: 11
Joined: Thu Oct 09, 2008 8:53 pm
Location: Canada

Post by QuailRider » Fri Aug 14, 2009 9:37 pm

bzoler wrote: it seems to me you didnt mod your case this way at all and have succeeded with your goal
You're correct, I didn't bother with any further dampening, and don't feel it's necessary. What's really creating the noise here? 1) video card fan, 2) HD, 3) fans.

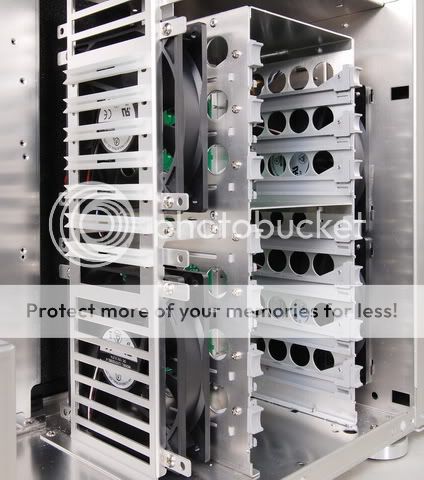
Let's take them one at a time. (1) The newest model WD Raptor and an older WD 7200 rpm drive became virtually inaudible when I suspended them and mounted them towards the upper rear of the case. I'm not kidding and was rather surprised by the difference: suspension made them quieter than the fans, and I can't tell that they're being accessed unless I look at the HD activity LED's. So suspension kills the HD noise.

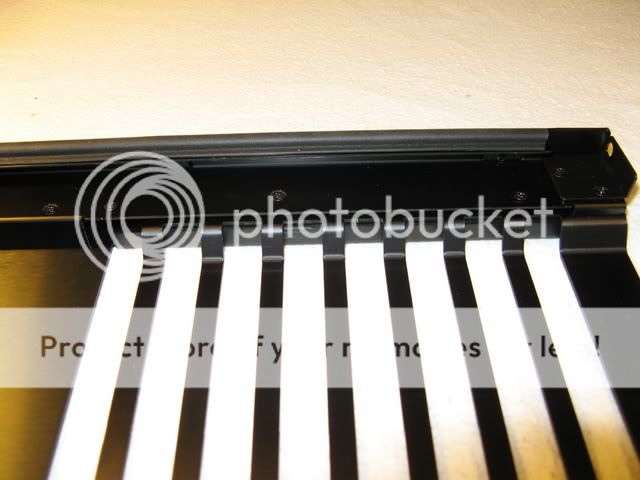
(2) Fans. 4x 120mm fans are used, and dialed down with a Scythe fan controller to 720 rpm. Well, 6 fans if you count the one in the power supply and the one attached to the CPU heat sink. They're barely audible in a quiet room, but just a whisper. Would further panel dampening make a difference here? I doubt it, as they're pointing right at the exterior of the case. You can dampen all you want, but the noise is still just going to waltz right out of the open grills. Only solution here is internally mount the fans using baffles. I tried that concept on a home made case a couple of years ago. Takes up too much space internally, the system ran hot from impaired airflow, and the baffles became resonant and didn't really muffle the noise that much.

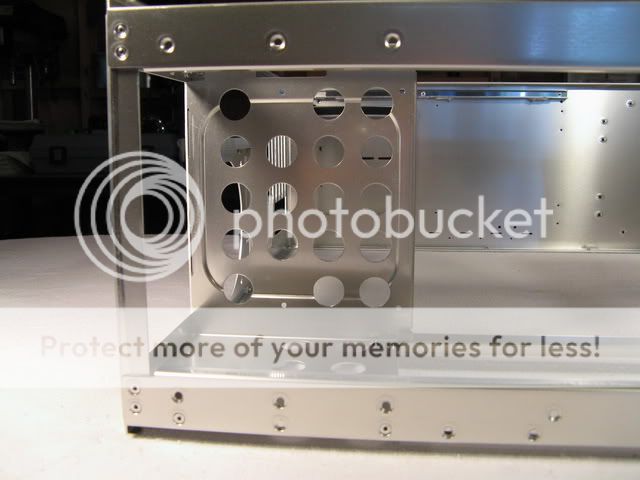
(3) Video card. Nothing you can do about it without getting into very expensive custom cooling solutions. It's a gaming card, runs hot by design. Quite quiet during idle, and not too bad at all when playing games. The low air restrictions and lots of intake air means it can get cool air easily and hence doesn't need to ramp up it's fan speed to max.

Would extra dampening beyond stock do much more? I doubt it. The side panels are already damped, and there aren't too many surfaces left to stick dampening material to anyway. Vibration is kept to a minimum through suspension. And any foam you stuff inside the case would just impair airflow and necessitate a higher fan rpm.

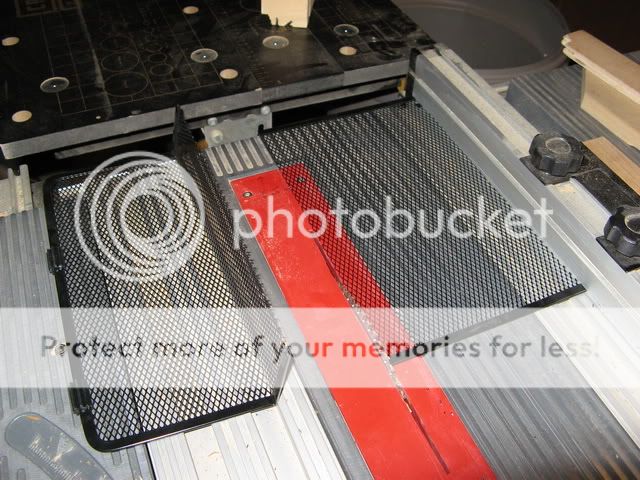
In summary, with this build I've taken the direct path low air restriction / quiet component approach, and it's worked quite well. I have no extra-dampening envy. Three critical elements cannot be overemphasized: (1) open up the case to improve air flow, (2) use lots of 120mm fans running at the lowest reasonable non-stalling speed using a fan controller, (3) you must suspend your HD, and preferably use 2.5" HD's (they're quieter and lighter).

It's not silent, but it's a whisper. Which is pretty good for a high end gaming system, and I'm happy with it as is. As a bonus, everything is so open that swapping out components is a snap. In the past I've done the carpet padding glued to every surface thing, water cooling, baffles, Antec p182 modded for improved airflow... this still remains my best build to date.

dodz
Posts: 1
Joined: Fri Mar 05, 2010 9:09 pm
Location: United States

Post by dodz » Fri Mar 05, 2010 9:12 pm

QuailRider wrote:
sanse wrote:nice work.

you will be amazed how much dust will accumulate inside after some time.

;-)

and how hard it will be to get that dust out. especially from fans and heatsink-ribs.
True enough. I've got two computers (a fileserver and an OpenBSD firewall box) that run 24/7, and are located in the room next to the workshop. They do indeed take in a fair bit of dust that wanders in from the shop. Every six months or so I take them outside and blast them with a blow gun (with low psi of course):
Can you post the picture of your blowgun? I am collecting the picture of blowgun.

diver
Posts: 327
Joined: Fri Dec 30, 2005 12:27 pm

Post by diver » Sat Mar 06, 2010 6:05 am

My machine is in a room with a tile floor and no curtains. The result is very little dust, but a live acoustic environment. For a couple of bucks, the computer stores sell pressurized gas in a can to use for cleaning.

Post Reply